
If I declutter before I move, I pack less, pay less, and unpack with far less stress. A solid clean-out can cut moving costs by up to 25%, and trimming household volume by 40% may save $500+ on a long-distance move.
Here’s the short version:
- I start 8 weeks before move day if I have a house, garage, attic, basement, or shed
- I begin with storage and low-use rooms
- I sort everything into keep, donate, sell, recycle, and trash
- I use simple rules: Do I use it? Does it fit the new place? Is it worth paying to move?
- I book donation pickup or junk removal 3 to 4 weeks ahead
- I set aside paint, batteries, chemicals, and electronics for proper drop-off
- I deal with large items first so they don’t slow down packing
- I pack only what earns a spot in my new home
A room-by-room plan usually works best because it keeps the job under control. I can still sort by category inside each room to catch duplicates, expired items, broken gear, old cords, extra kitchen tools, worn clothes, and furniture that won’t fit the next place.
My goal is simple: move only what I want to use, keep, and make space for.
10 Things to Declutter Before a Move (No One Tells You)
sbb-itb-096ce5b
Set a Decluttering Timeline for Your Move
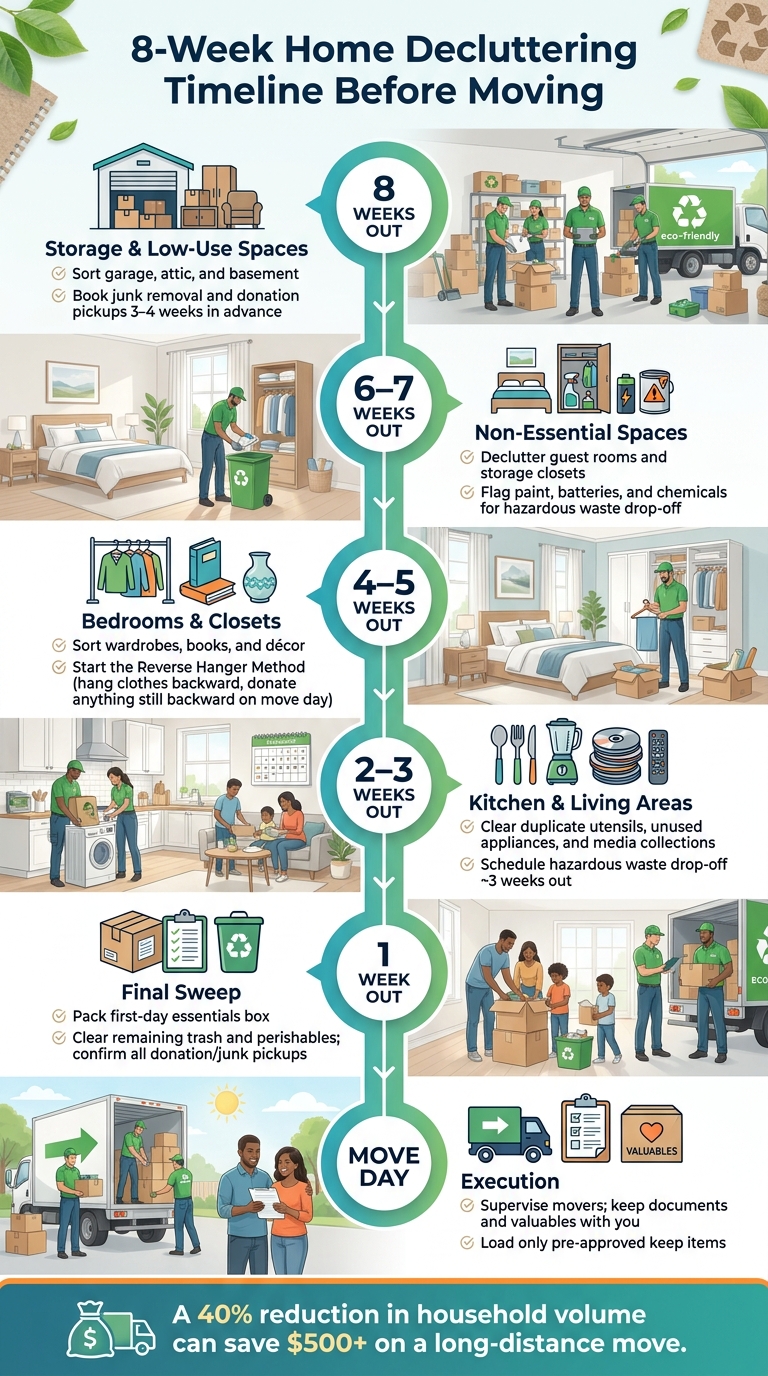
8-Week Home Decluttering Timeline Before Moving
Work backward from move day. If you’re moving out of a large home with a garage, attic, basement, or shed, give yourself the full 8 weeks. A smaller apartment may only take 1 to 2 weekends.
The big thing is pacing. Short, focused sessions are usually better than marathon clean-out days. You get more done, and you don’t hit that wall where every old cord, mystery box, and half-used candle starts to feel personal. Start with storage spaces first, then go room by room.
Start With Storage Areas and Low-Use Spaces
Begin with the garage, attic, basement, shed, guest room, and other low-use areas. These spots tend to hold the most forgotten stuff and seasonal items, and going through them won’t throw off your day-to-day life.
They also tend to have fewer sentimental items. That makes decisions easier at the start, which helps you build some momentum before you get to bedrooms, closets, and other more personal spaces.
There’s another upside: clearing a garage or basement early gives you a place to stack packed boxes. It also makes it easier to line up junk removal before schedules get tight. Book junk removal and donation pickups early – ideally 3 to 4 weeks in advance – since end-of-month dates go fast [4][6].
Paint, batteries, and chemicals need their own disposal plan and can’t go in regular trash. Flag those items early and set a drop-off appointment about 3 weeks before your move [1][6].
Break the Work Into Weekly Milestones
Use this weekly pace as a starting point. If your home has more storage, start earlier.
| Timeframe | Focus Area | Key Tasks |
|---|---|---|
| 8 Weeks Out | Storage & Low-Use Spaces | Sort garage, attic, and basement |
| 6–7 Weeks Out | Non-Essential Spaces | Declutter guest rooms and storage closets |
| 4–5 Weeks Out | Bedrooms & Closets | Sort wardrobes, books, and décor; start the Reverse Hanger Method |
| 2–3 Weeks Out | Kitchen & Living Areas | Clear duplicate utensils, unused appliances, and media collections |
| 1 Week Out | Final Sweep | Pack your first-day essentials box; clear remaining trash and perishables |
| Move Day | Execution | Supervise movers; keep documents and valuables with you |
At 4 to 6 weeks out, use the Reverse Hanger Method: hang clothes backward, flip worn items forward, and donate anything still backward on move day [2].
As you work through each room, sort items into keep, donate, recycle, sell, and trash bins.
Build a Room-by-Room Moving Declutter Checklist
A room-by-room checklist makes moving decluttering a lot less messy. It helps you avoid skipping the spaces you barely think about, and it keeps the job from feeling like one giant mountain. Track your progress room by room, then use that timeline to tackle one space at a time.
Use Keep, Donate, Recycle, Sell, and Trash Bins in Every Room
Before you start, set up five clearly labeled bins or zones: Keep, Donate, Sell, Recycle, and Trash. Use the same five in every room so your sorting system stays consistent across the house.
Within each room, sort by category. Put clothes with clothes, paperwork with paperwork, and small appliances with small appliances. That makes duplicates easier to spot, which is half the battle.
If you haven’t used it, worn it, or thought about it in the past year, move it to donate, sell, or recycle [5].
Set aside a separate box for batteries, paint, chemicals, and electronics that need to be wiped first [4].
Move Through the Home in a Practical Order
Start with storage spaces first. Then move through bedrooms, closets, offices, kitchens, bathrooms, and living areas in that order.
Some spaces tend to collect the most junk:
- Garage, attic, and basement: Broken furniture, old tools, rusted outdoor décor, seasonal items you never use, and forgotten boxes
- Kitchen: Duplicate utensils, small appliances unused for a year, expired pantry goods and spices, chipped dishes, and plastic containers without matching lids
- Bathrooms: Expired medications, old makeup, worn towels, and half-used toiletries
- Home office: Mystery cables, outdated printers or monitors, old manuals, and dried-up supplies
- Laundry room: Worn-out laundry baskets, damaged shelving, and outdated or leaking cleaning supplies
- Patio and outdoor spaces: Rusted grills, broken lawn equipment, yard waste, and damaged outdoor toys or furniture
These spaces are usually easier to clear when you sort items into simple keep-or-discard piles.
Room-by-Room vs. Category-Based Decluttering: Which Works Better
For a move, room-by-room usually works better because it keeps decisions contained and lets the rest of the home stay usable. Category sorting still has a place, but it works best inside each room when you want to spot duplicates.
Once each room is sorted, move to the next step to decide what to keep, donate, recycle, sell, or discard.
Decide What to Keep, Donate, Recycle, Sell, or Throw Away
Use the same keep, donate, recycle, sell, and trash bins from your checklist to make the final call on each item. Once you’ve sorted each room into bins, it’s time to decide what actually moves with you.
Ask Simple Questions to Make Faster Decisions
The fastest way to make choices is to stop asking, "might I need this someday?" and switch to better questions. For each item, run through these four:
- Do I have a clear reason to keep this in my new home? If not, move it to donate, sell, or disposal.
- Would I buy it again today? If the answer is no, don’t pay to move or store it [5].
- Does it fit my new space? An oversized sectional, heavy desk, or bed frame that won’t fit the new floor plan isn’t worth the hassle.
- Is it worth the cost to move it? Moving costs are tied to weight and volume. A 40% reduction in household volume can shave over $500 off a long-distance moving bill [5].
That last question helps a lot with worn mattresses, heavy old desks, and duplicate kitchen gadgets. If it costs less to replace than to pack and haul, let it go.
Match Each Item to the Right Next Step
Use one clear standard for each category. Keep only what you use often and what fits your new home. Donate items that are clean, working, and complete. Sell higher-value pieces like solid wood furniture, recent tech, or designer clothing. Recycle items like metal frames or broken electronics through local recycling or e-waste drop-off services. Trash anything broken, damaged, or unsanitary.
Pull out hazardous materials early. Old paint, cleaning chemicals, and batteries don’t belong in regular trash. Take them to a local hazardous waste drop-off [3][1].
Decision Matrix for Common Household Items
| Item Type | Keep | Donate | Recycle | Sell | Trash |
|---|---|---|---|---|---|
| Clothing | Fits well, worn recently | Clean, good condition | Worn out or torn textiles | Designer or high-value brands | Stained or unsanitary |
| Books | Favorites or reference | General titles in clean condition | Damaged or yellowed pages | Rare editions or textbooks | Moldy or water-damaged |
| Small Appliances | Used weekly, all parts present | Working, complete set of parts | Broken electronics (e-waste) | High-value or like-new | Unsafe or frayed cords |
| Electronics | Used daily or weekly | Working, older models | Dead batteries, cords (e-waste) | Recent tech or gaming consoles | Broken screens (e-waste drop-off) |
| Large Furniture | Fits new floor plan | Stable, no stains | Metal frames or scrap | Solid wood or antiques | Broken or heavily damaged |
| Mattresses | Less than 8–10 years old, clean | Rarely accepted by charities | Check local facility options | Only if like-new | Worn, sagging, or stained |
Set aside bulky, broken, or unsanitary items now so you can deal with them before move day.
Handle Bulky Items and Clear the Home Before Move Day
Once your keep, donate, recycle, sell, and trash piles are set, deal with the biggest stuff first. Bulky items – sofas, mattresses, large appliances, and oversized household junk – are heavy, awkward to move, and often not accepted in curbside pickup [3]. Most city waste services also set tight limits on large-item collection, and pickup dates may not match your moving schedule [3].
Before pickup, get appliances and hot tubs ready. Unplug them, defrost them, drain them, and disconnect them ahead of time. It’s one of those small jobs that can save a lot of chaos later.
Choose Eco-Friendly Disposal for Large and Difficult Items
Start with anything that still has some life left in it. Then deal with recycling and disposal for the rest.
If a bulky item is still usable, check a charity’s current acceptance rules before you load it up and drive over [6]. Policies can change, and not every location takes every item. Broken appliances and metal bed frames are often a fit for scrap metal recycling. Electronics should go to e-waste drop-off centers. Tossing them out the wrong way can lead to fines [3][6].
Schedule Junk Removal for Items That Are Too Heavy, Bulky, or Time-Consuming
Some things just aren’t worth wrestling with on your own. In those cases, a junk removal service can make the job much easier.
Look for a company that handles appliances, furniture, mattresses, and oversized household junk. It also helps if they donate and recycle first, with landfill use kept as a last step.
Book pickup early if you want the date that works best for your move. Then stage the outgoing items near the exit, but separate from the things you’re keeping. If you have both donation items and junk, place them in different areas so the crew can move faster and avoid mix-ups.
Do a Final Sweep and Pack Only What Stays
Once the bulky items are gone, the only pile left should be what stays with you. Walk through every room one last time and pack only what belongs in the new home.
If something is still sitting in a “maybe” pile this late in the process, that’s usually your answer. Don’t load it onto the truck.
FAQs
How do I declutter if I’m short on time?
Use a room-by-room approach to keep things organized and stop the process from feeling like too much at once. A simple rule helps here: if you haven’t used something in the past 12 months, it’s probably time to let it go.
If you want to speed things up, have each family member sort their own stuff. That cuts down on back-and-forth and makes decisions easier. For bulky items like old furniture or appliances, schedule professional junk removal so you can clear space fast without lifting heavy pieces yourself.
What should I do with sentimental items I can’t decide on?
Focus on whether the item still brings joy or suits the life you want in your new home. For photos or paperwork, digitizing them can help you keep the memory without hanging on to extra clutter.
If you’re not sure yet, begin with the easy stuff first – areas that don’t carry much emotion – and circle back to sentimental items later. That makes the process feel less heavy. And yes, it’s okay to let go of things that belonged to an older chapter of your life.
What items can movers or trash pickup refuse to take?
Movers often won’t take hazardous materials like paint cans, chemicals, solvents, and fuel. The reason is simple: these items need special handling and disposal.
Regular trash pickup may also turn away electronics and some appliances. In most places, you’ll need to sort those items separately and bring them to approved recycling centers or drop-off sites based on local waste rules.