
Moving your office can be stressful, but a clear plan can save time, money, and energy. This guide breaks down the process into 12 actionable steps, from assigning a move manager to responsibly disposing of unwanted items. By decluttering, organizing, and scheduling services in advance, you can avoid unnecessary costs, reduce downtime, and ensure a smooth transition to your new workspace. Key takeaways include:
- Appoint a Move Manager: Start planning 4–6 weeks ahead for small offices or 3–6 months for larger ones.
- Inventory and Sort Items: Categorize everything into "Keep", "Donate", "Recycle", or "Trash."
- Eco-Friendly Disposal: Use certified recyclers and donate reusable items to reduce landfill waste.
- Label and Pack Efficiently: Use color-coded systems and detailed inventories to simplify unpacking.
- Coordinate Moving Day Logistics: Reserve loading docks, finalize floor plans, and prepare "Day One" essentials.
- Final Walkthrough: Inspect the old office, clean thoroughly, and document the condition to secure your deposit.
These steps ensure a more organized, cost-effective move while supporting responsible disposal practices.
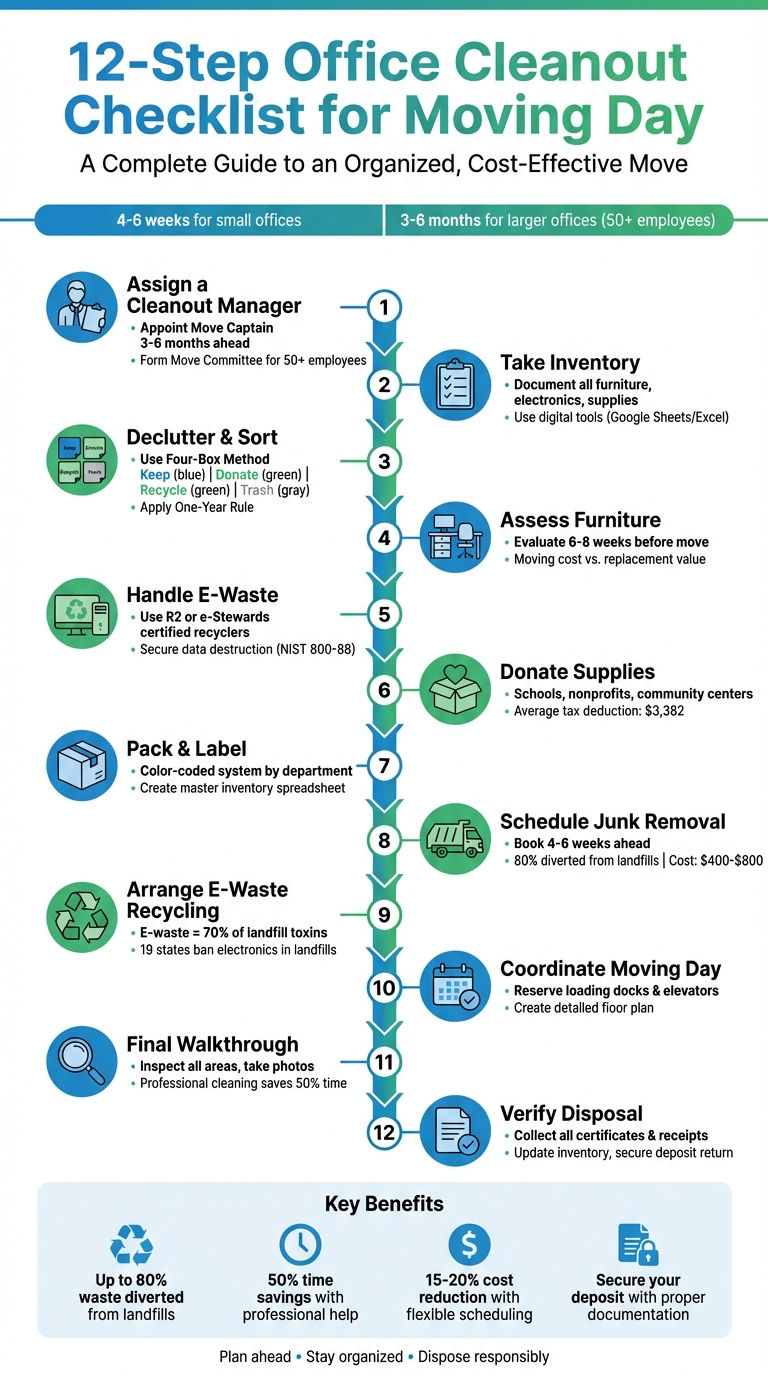
12-Step Office Cleanout Checklist for Moving Day
Decluttering to Move! Tips & Ideas
sbb-itb-096ce5b
Step 1: Assign a Cleanout Manager and Create a Plan
The first step in organizing an office cleanout is appointing someone to take charge. This person, often called a Move Captain, will act as the central point of communication for staff, vendors, and management [2]. Without a leader to oversee the process, tasks can easily slip through the cracks, deadlines may be missed, and chaos can take over. Assigning this role ensures the cleanout stays on track and organized.
"Choose a detail-oriented team member who excels at communication. They’ll track milestones, coordinate with vendors, and keep everyone informed throughout the process." – Julie Cabrera, General Manager, White Glove Moving & Storage [3]
The ideal manager should have strong project management skills, be comfortable using digital tools like Google Sheets or Airtable for real-time tracking [7], and know how to evaluate vendors for junk removal services, e-waste recycling, shredding, and moving [2][6]. If your office has more than 50 employees, consider forming a Move Committee with representatives from IT, HR, and Operations to cover all bases [5].
Timing is key. For larger offices, appoint your cleanout manager 3–6 months ahead of the move, while smaller spaces typically need 4–6 weeks. This allows enough time to create a phased timeline, review lease obligations, and lock in vendor bookings [2]. Breaking the process into manageable phases – such as one week for inventory, two to three weeks for packing, and a final week for removal – helps keep things organized and avoids last-minute stress [7].
To ensure steady progress, have the manager divide the office into zones (e.g., reception, workstations, storage, breakroom) and assign a lead for each zone [7][8]. This approach keeps the process systematic and ensures no area is overlooked.
Step 2: Take Inventory of Office Items
Once you’ve assigned a cleanout manager, the next step is to document everything in the office. Walk through each room and create a detailed list of all furniture, electronics, supplies, and decor. This inventory helps you keep track of what you have, ensures nothing gets left behind, and sets you up for a smooth sorting process and responsible disposal when moving day arrives.
Start by sorting items into four categories:
- Keep: Items you’ll take to the new space.
- Donate: Usable items you no longer need.
- Recycle: E-waste and scrap materials.
- Trash: Broken or unusable items.
When handling "Recycle" and "Trash" categories, focus on environmentally responsible disposal methods. To stay organized, use a digital tool like Google Sheets or Excel to track details for each item, such as box number, current location, destination room, condition, and priority level. For offices with valuable assets, take photos of electronics and furniture to document their condition – this can be crucial for insurance claims.
"Creating an inventory ensures that nothing gets lost or misplaced during the move, and it will also come in handy when it’s time to file an insurance claim if something is damaged during transport." – Meyer Inc
To make things manageable, divide your office into zones like reception, workstations, conference rooms, storage areas, and breakrooms. Assign a lead person to each zone to assess the condition of every item, rating them as Excellent, Fair, or Broken. This step helps you avoid wasting resources on moving items that are damaged or won’t fit in the new space.
Color-coded labels can also make the process smoother. Assign a specific color to each department so movers can easily identify where boxes should go in the new office. For high-value or sensitive equipment, consider using physical tags or RFID labels to track items throughout the move. A thorough inventory not only minimizes the risk of losing items but also ensures a more efficient and sustainable relocation.
Step 3: Declutter and Sort Items
Now that your inventory is complete, it’s time to review every office item and decide what stays and what goes. By eliminating redundant assets, you can cut down on moving costs while giving useful items a second chance through donation or recycling.
How to Declutter Effectively
A great way to organize your decluttering process is by using the Four-Box Method: categorize items into Keep, Donate, Recycle, and Trash. Stick to the "touch it once" rule – make a decision about each item right away without revisiting it. This keeps the process efficient and helps you avoid unnecessary delays.
The One-Year Rule can also guide your decisions. If an item hasn’t been used in over a year and doesn’t play a critical role in your business operations, it’s probably time to let it go. Factor in the cost of moving versus the value of the item. For instance, moving a single unused storage unit could cost between $200 and $400, while transporting an extra desk might run $150 to $300 [10]. If the cost of moving an item outweighs its usefulness or replacement value, consider donating or recycling it instead.
To avoid feeling overwhelmed, tackle one office zone at a time. This ensures nothing gets overlooked and keeps the process manageable for your team. For items with high resale value, selling them can help offset some of your moving expenses.
Once everything is sorted, the next step is disposing of items responsibly.
Eco-Friendly Disposal Methods
After sorting your items, focus on disposing of them in an environmentally conscious way. Many eco-friendly junk removal services aim to reuse, recycle, or donate up to 80% of what they collect [1]. Follow a similar approach: prioritize reuse within your company, then donate to local organizations, recycle what you can, and only send items to the landfill as a last resort.
Donation is a great option for clean, functional items in good condition. Desks, chairs, monitors, unopened office supplies, and books can often be donated to schools, nonprofits, start-up incubators, libraries, or community centers. Teacher resource centers are especially interested in items like printer paper and folders. If you’re donating electronics, make sure to securely wipe all data or perform a factory reset to comply with data protection laws. Avoid donating broken or unsafe items – those should be recycled or properly disposed of.
For items that can’t be donated, sort them by material type. E-waste like computers, monitors, and printers should go to certified recyclers with R2 or e-Stewards certification to ensure toxic components are handled responsibly. Hazardous waste, such as lithium-ion batteries, fluorescent bulbs, toner cartridges, and cleaning chemicals, must be taken to local waste authorities for specialized disposal. Lastly, sensitive documents should be securely shredded rather than recycled to maintain data security and compliance.
Step 4: Assess Furniture for Reuse or Removal
Now that smaller items are sorted, it’s time to tackle larger furniture. For each piece, consider three main factors: its role in your business, its physical condition, and whether it complements the design and layout of your new office. The goal is to balance practicality with thoughtful disposal. This step builds on earlier sorting efforts to decide which furniture is worth the expense of moving.
Before committing to moving large furniture, double-check that each item can physically fit into your new space. Measure doorways, hallways, elevators, and stairwells to avoid headaches later. Use your new office floor plan to map out where each piece will go, ensuring it works with the flow of the space. For example, if your office is transitioning to a hybrid model with hot-desking, those bulky individual desks might not be practical anymore.
Weigh the cost of moving each item against its replacement value. If moving it costs more than replacing it – or if it won’t serve a purpose in the new office – it’s better to sell, donate, or recycle it.
"Moving unwanted furniture costs money, takes up valuable space, and wastes time you could spend on more important aspects of your relocation." – Move Solutions [10]
Start this evaluation early – ideally 6–8 weeks before your move date. This gives you time to arrange donation pickups, list items for sale, or schedule professional removal services. Selling high-value pieces can help offset moving costs, while donating usable items to nonprofits, schools, or community centers can make a positive impact. Plus, donations may qualify for tax deductions – just remember to document everything with photos and receipts.
Once furniture decisions are made, you’ll be one step closer to a streamlined move. Keep the momentum going by organizing other moving-day essentials.
Step 5: Identify and Handle Electronics and E-Waste
Start by creating an inventory of all electronic devices – computers, monitors, printers, phones, networking equipment, servers, and chargers. This list is essential for organizing and securely managing your office’s electronics [11].
Divide these items into three groups: devices you’ll take to the new office, functional equipment suitable for donation (like laptops, tablets, and flat-screen monitors), and outdated or broken items that need recycling [11]. When dealing with data, ensure it’s securely destroyed following NIST 800-88 or DoD-compliant protocols – a simple factory reset won’t cut it [11]. To make sorting easier, use color-coded labels: green for items to keep, yellow for donations, and red for recycling [7].
Be mindful of hazardous components requiring special care. Items like lithium-ion batteries, CRT monitors, toner cartridges, and fluorescent bulbs contain harmful substances such as lead, mercury, and cadmium [11][13]. In fact, 19 U.S. states have banned electronics from landfills as of 2024 [11]. For safe transport, tape the terminals of batteries to prevent short circuits [11].
"One laptop in a landfill = decades of lead and mercury contamination." – GreenCitizen [11]
Work only with certified recyclers who have R2 (Responsible Recycling) or e-Stewards certifications to ensure electronics are processed domestically and meet EPA standards [11]. Many electronics – like cell phones, laptops, and tablets – can be recycled for free, while items such as CRT monitors, printers, and large appliances may involve recycling fees [11]. Before paying for recycling, check if manufacturers like Apple, Dell, or HP offer free mail-in take-back programs [11]. Always request a Certificate of Destruction or Recycling for your compliance records and potential tax deductions [11].
Step 6: Donate Unused Office Supplies
Now that you’ve tackled sorting through your office electronics, it’s time to shift focus to those unused supplies gathering dust in drawers and closets. Items like pens, pencils, markers, notebooks, paper, envelopes, binders, folders, staplers, and clipboards are often needed by schools, tutoring programs, and nonprofits. Before donating, take a moment to check that pens and markers still work, and ensure staplers or calculators are in good condition. For binders and folders, remove any old documents or sensitive information to make them ready for donation. Opting to donate instead of discarding not only reduces landfill waste but also helps extend the life of these supplies.
Reach out to potential recipients to confirm they can accept your items, as some schools and nonprofits have restrictions on what they can take. Online tools like the National Cristina Foundation’s "Non-Profit Locator" can help you find organizations nearby by zip code, while platforms like iLoveSchools allow teachers to share specific wish lists. Local nonprofits, schools, and community groups are also great options. This step supports a circular economy by keeping resources in use and benefiting others. Once you’ve identified where to donate, organize the items for easy packing.
Group similar items together – for instance, pens with pens and paper with paper – and pack them in sturdy boxes. Clearly label each box with its contents, and for added clarity, mark donation boxes with "DONATE" to avoid any mix-ups during your move. Heavier items, like reams of paper or books, should go in durable boxes to prevent damage during transport.
"What is clutter to you might be a treasure to someone else." – Frontier Waste Solutions
To stay organized, keep a spreadsheet listing all the items you’re donating. This not only helps the recipient but also provides documentation for potential tax deductions. Be sure to request a donation receipt when you drop off or arrange for a pickup. Fun fact: in 2022, taxpayers who donated household goods reported an average of $3,382 in tax deductions [16].
Step 7: Pack and Label Essential Items
After decluttering and donating, it’s time to pack and label everything efficiently to streamline your move. A well-thought-out labeling system can make unpacking much smoother. Use a color-coded system to assign colors to each department – like blue for Marketing, red for Sales, and green for the Kitchen. Pair this with a unique move number for every office, cubicle, and workstation, tying it to your new floor plan. Make sure to label at least two narrow sides of each box so the labels are visible even when stacked. For items that are similar, use sequential labels (e.g., 4A, 4B, 4C) to keep things orderly.
Keep track of everything with a master inventory spreadsheet. This should include box numbers, the areas they’re coming from and going to, their contents, and their priority level. This system ensures that unpacking meets each department’s immediate needs. For sensitive items like documents and cables, take extra care to pack them securely to avoid mix-ups or damage.
"A great labeling system is the secret to a fast and organized unpacking process. A poorly labeled box is just a mystery to be solved later, wasting valuable time." – Silas, Founder, Flavor365 [5]
Each team should have an "Open First" box filled with essentials like power strips, chargers, and basic supplies for immediate use. Before packing up electronics, take photos of the back of computers to document cable connections for easy reassembly. Use zip ties or velcro straps to keep cables neat, and store them in clearly labeled bags with the user’s name. Highly sensitive documents – such as bank records or social security cards – should travel in your personal vehicle instead of the moving truck for added security.
For fragile items, wrap them in bubble wrap and fill empty spaces in the boxes with packing peanuts or crumpled paper to prevent movement during transit. If you’re using reusable plastic crates, stack them no higher than four on a dolly to keep them stable. For desks or cabinets with push locks but no keys, use tape to secure the locks and prevent accidental engagement during the move. These small steps can save time, reduce stress, and help ensure a smooth transition.
Step 8: Schedule Green Light Junk Removal Services

Once the essentials are packed and labeled, it’s time to tackle those bulky office items. To keep things smooth and cost-effective, book Green Light Junk Removal about 4–6 weeks before your moving day. Waiting until the last 48 hours before your lease ends can lead to higher costs and fewer options.
Green Light Junk Removal specializes in handling large office items like desks, cubicle panels, filing cabinets, and conference tables. Their process is thorough: items are sorted into categories like Donate, Reuse, Recycle, or Dispose. This approach keeps 80% of materials out of landfills. Electronics and e-waste are sent to certified recyclers, while reusable items are donated to local charities.
"After handling thousands of office cleanouts over the past decade, we’ve learned that the smoothest jobs aren’t always the biggest or smallest – they’re the ones where clients give us a walkthrough beforehand and a few days of scheduling flexibility, which often saves them 15-20% and eliminates last-minute stress." – Jiffy Junk Operations Team
Many businesses prefer to schedule cleanouts during evenings or weekends to avoid disrupting their workday. Before the crew arrives, make sure filing cabinets are emptied, desk clutter is cleared, and items are consolidated. Don’t forget to coordinate with building management to reserve loading docks and freight elevators – this helps avoid delays and extra labor charges.
For most standard office cleanouts, costs range between $400 and $800, depending on factors like the volume of items, accessibility, and types of materials. Offering 3–5 days of scheduling flexibility can reduce costs by 15–20%. Additionally, the service includes secure document shredding to protect any sensitive information.
Step 9: Arrange E-Waste Recycling
Handling electronics properly is just the beginning – recycling e-waste requires specific steps to manage its environmental impact.
Electronics are packed with toxic heavy metals such as lead, mercury, and cadmium. Shockingly, while e-waste represents just 2% of landfill volume, it accounts for a staggering 70% of the toxic heavy metals found in landfills [15]. To combat this, 19 U.S. states have laws prohibiting electronics from being dumped in landfills, requiring the use of certified recyclers instead [11].
Look for recyclers with R2 or e-Stewards certifications. These certifications, accredited by the EPA, ensure recyclers meet strict standards for environmental protection, worker safety, and data security. Certified facilities also undergo regular third-party audits and adhere to protocols that prevent hazardous waste from being illegally exported to developing countries [11][18][19]. This ensures both hazardous materials and sensitive data are handled responsibly.
Before recycling, take steps to secure your data. Back up important files and use NIST 800-88–compliant tools to securely wipe devices [19]. Don’t forget to remove SIM cards and SD cards from mobile devices and unregister any software licenses [20]. Batteries require special attention – tape the terminals on lithium-ion batteries to avoid short circuits [11][14].
Ask for Certificates of Destruction and Recycling from your recycler. These documents confirm proper disposal and can also be useful for tax purposes [12][19]. While many recyclers accept devices like laptops, tablets, and cell phones at no cost, items such as CRT monitors, printers, and large appliances may come with a recycling fee [11][19].
Additionally, check if the manufacturer offers a take-back program. Companies like Apple, Dell, HP, and Samsung often have free mail-in or drop-off options [11][19]. Retailers such as Best Buy also accept electronics for recycling, typically allowing up to three items per household per day, though state-specific policies may apply [19].
Step 10: Coordinate Moving Day Logistics
Start planning the details of moving day a few weeks in advance. Meet with property managers at both your current and new locations to clarify move-day requirements and establish a clear schedule. Reserve loading docks and elevators through building management to avoid delays or conflicts with other tenants. It’s often best to schedule the move for a weekend or a slower business day to ensure easier parking for large moving trucks and less building traffic. Additionally, secure building access ahead of time to keep the process running smoothly.
To manage access efficiently, create a checklist of all keys, parking passes, and security cards to collect and deactivate the day before the move. Order new keys and access cards for the new office at least two weeks in advance so they’re ready when you arrive. Make sure the moving company has authorization to access all necessary areas, and assign team members to oversee building access and handle the final lock-up of the old office.
Once access is sorted, use a detailed floor plan to guide the move. A well-thought-out floor plan can turn potential chaos into a streamlined operation. Tools like SmartDraw or Floorplanner can help you design accurate layouts of your new office space [17]. These plans allow movers to place large items exactly where they belong, saving you the hassle of rearranging heavy furniture later. They also help identify the locations of power outlets, ethernet connections, and phone lines, so tech-heavy workstations can be set up near the utilities they need [6][17]. Keep in mind, nearly half (46%) of businesses that experience downtime during a move struggle to maintain services for their customers as a result [21].
Share the floor plan with your moving team to provide clear instructions and reduce confusion. Color-code by department – assign each department a specific color on the floor plan and use matching labels on their boxes and furniture [17]. Before moving day, walk through the new space to confirm measurements and placements. Label cables and match them to corresponding floor outlets or ports on the plan to ensure IT systems are connected correctly upon arrival [17][21]. Sharing this plan with movers reinforces the preparation you’ve already done.
Finally, gather the tools and supplies you’ll need for moving day. To minimize waste and energy use, align your logistics with eco-friendly practices. Pack a "Day One Essentials Kit" to carry with you, including the floor plan, box cutters, trash bags, and basic tools [5]. Use a tape measure ahead of time to confirm that larger furniture can fit through doorways, elevators, and stairwells at the new location, avoiding last-minute surprises [4]. Employees should also take photos of the backs of their computers before unplugging them – this makes reconnecting monitors and docks much quicker at the new office [5][17].
Step 11: Perform a Final Walkthrough and Cleaning
Once everything is loaded and the movers have left, take a final walkthrough of the empty office. This step is crucial to make sure nothing has been overlooked, proper disposal is handled, and lease requirements are met. Break the office into sections – like reception, workstations, kitchen, conference rooms, and storage areas – and assign someone to inspect each thoroughly. Check inside filing cabinets, drawers, shelves, and cupboards. Don’t forget spots like under desks, behind doors, inside built-in storage, or the tops of tall cabinets.
Pay extra attention to easily forgotten areas. In the kitchen and breakroom, empty the refrigerator, inspect the coffee maker and water cooler, and get rid of expired items or damaged dishware. In conference rooms, clean off whiteboards and remove any leftover meeting agendas or forms. For reception and shared spaces, take down magazines, brochures, or unused decor, and check couches or chairs for anything tucked into the cushions. Also, gather all employee keys, parking passes, security badges, and access cards to return to building management.
Take photos of the cleared space to document its condition. This can help protect your security deposit and prove the office was left damage-free. As Two Men and a Junk Truck explains, “If you’re moving out of a leased office, [a final walkthrough] helps ensure you get your security deposit back.” Review your lease’s terms to confirm you’ve met all cleaning and restoration obligations.
After the walkthrough, schedule professional cleaning services. Do this once the office is fully cleared but before your lease officially ends. Moving furniture and packing boxes often stirs up dust and debris, so cleaning too early can mean extra work. Choose a cleaning provider with commercial experience, proper licensing, and liability insurance. If eco-friendly disposal is important, confirm that’s part of their service. Professional cleaners can save up to 50% of the time it takes to clear a space compared to doing it yourself [8]. Focus on high-touch areas like door handles, light switches, windows, carpets, and kitchens and bathrooms for sanitization.
When cleaning, prioritize high-traffic areas and instruct cleaners to work from top to bottom. Start with ceilings, vents, and high shelves, then finish with the floors to catch any falling dust or debris. Vacuum carpets thoroughly, and if your lease requires it, consider professional steam cleaning. Mop hard floors with the appropriate disinfectants. Once cleaning is done, take detailed "after" photos as evidence of the office’s final condition.
Step 12: Verify Disposal and Update Inventory
After your final walkthrough, it’s time to make sure everything has been properly disposed of and your inventory is fully updated. Start by systematically going through each room and double-checking that every item has been removed, donated, recycled, or disposed of as planned. Don’t forget to inspect often-overlooked spaces like closets, storage rooms, and the areas under desks.
Gather all official documentation from your service providers. For example, request certificates of destruction for shredded documents or sensitive data, recycling receipts for e-waste, and donation receipts from charities. These documents are critical – they confirm compliance with regulations, help with tax deductions, and protect your business from potential disputes. As Olympia Moving emphasizes, “Carefully managing the secure disposal and purging of sensitive information is vital to protect your business and comply with data protection regulations” [9].
Update your inventory records by cross-referencing the original list with the final disposition of each item. Add a column detailing what happened to each asset – whether it was moved to your new location, donated to a specific charity, recycled at a certified facility, or discarded. For electronics, be sure to include serial numbers and match them to the certificates of destruction or recycling provided by your vendors [9]. This detailed record-keeping not only ensures accuracy for accounting purposes but also protects your company from future legal or financial issues.
Take final photos of the empty office space for your records. Then, schedule a walkthrough with your landlord or property manager to document the condition of the property. Make sure to get a signed acknowledgment of the space’s state. The American Apartment Owners Association advises, “If there are any security deposit disputes, this [checklist] will be your number one piece of evidence – so always keep copies” [22].
Finally, save everything – inventory lists, photos, certificates, receipts, and the landlord’s sign-off – into a secure digital folder. This thorough documentation will help you claim tax deductions for donations, prove compliance with environmental regulations, and recover your full security deposit without any trouble. These final steps wrap up the cleanout process and pave the way for a seamless move.
Conclusion
Successfully clearing out an office takes careful planning and strong leadership. Starting your preparations 4–6 weeks ahead gives you ample time to inventory assets, organize vendors, and set expectations with your team [2]. Assigning a cleanout manager ensures tasks stay on track and that everyone knows their responsibilities.
Opting for responsible disposal methods benefits both your business and the community. Choosing donation and recycling can divert up to 80% of unwanted items from landfills while supporting local organizations [1]. Properly managing e-waste and sensitive documents through certified facilities not only protects your company from legal risks but also highlights your commitment to environmentally conscious practices.
These approaches also pave the way for a more seamless transition when paired with professional assistance. Hiring experts like Green Light Junk Removal simplifies the process by handling heavy lifting, disassembly, and hauling, allowing you to focus on keeping your business running smoothly. In fact, professional services can cut cleanout time by up to 50% [8], reducing disruptions and improving safety for your team.
Completing a final walkthrough and keeping accurate documentation helps secure your security deposit and ensures proper tax records. A well-organized cleanout not only minimizes stress but also sets the tone for a fresh, efficient start at your new location with only the essentials in tow.
FAQs
What should my “Day One essentials” box include?
Your "Day One essentials" box is all about making the first day in your new office as smooth as possible. Here’s what you should pack to hit the ground running:
- Key documents and files: Keep important paperwork handy for immediate access.
- Basic office supplies: Stock up on pens, notepads, sticky notes, and other must-haves.
- IT equipment: Include laptops, chargers, and any other tech essentials like keyboards or mice.
- Personal items: Think about things your team might need, like coffee mugs or desk organizers.
- Cleaning supplies: A quick clean-up kit can handle any unexpected messes.
With these essentials ready to go, your team can settle in and focus on their work from the very first day.
How do I prove e-waste and document disposal was done properly?
To ensure proper handling of e-waste and document disposal, always request certificates of destruction from certified recyclers or disposal services. These certificates serve as proof that disposal complies with environmental and security standards. They often include details such as the services provided, certification numbers, and serial numbers of the disposed items. Additionally, Certificates of Recycling can confirm compliance with EPA, OSHA, and state regulations, offering essential documentation for audits or internal record-keeping.
When should I book junk removal and recycling before moving day?
It’s a smart idea to schedule junk removal and recycling services 1 to 3 months before your moving day. This timeframe gives you enough room to plan, organize, and dispose of items responsibly. By booking early, you can avoid the chaos of last-minute arrangements and ensure everything is ready for a smoother, less stressful move.