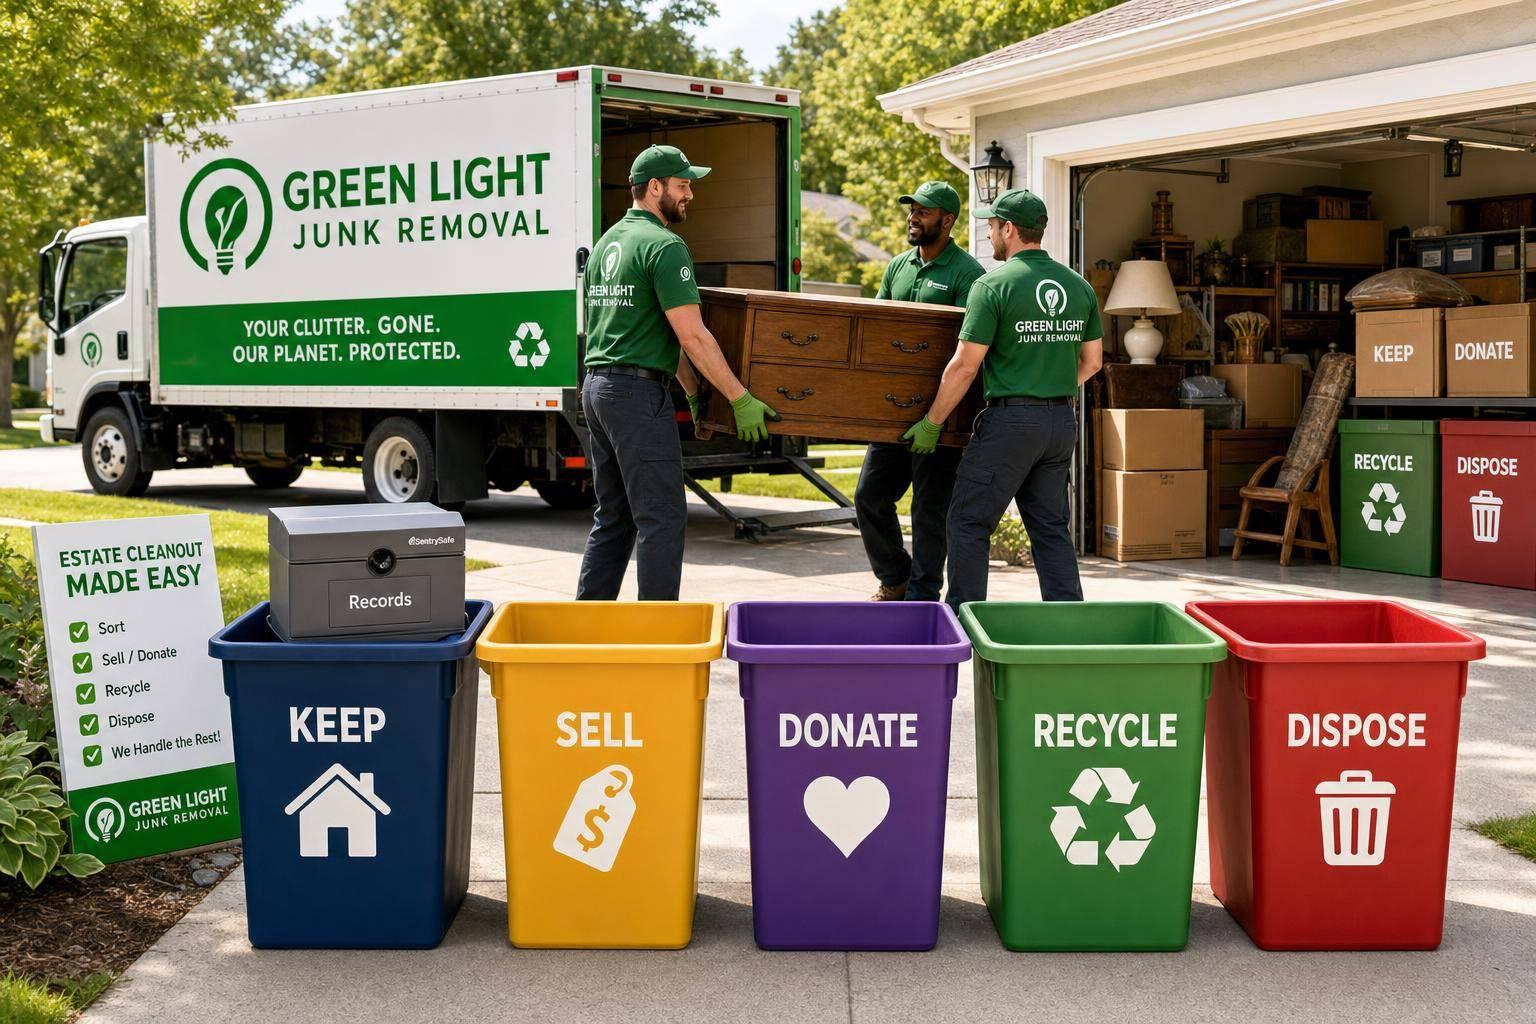
An estate cleanout gets easier when I slow down at the start and follow a clear order: confirm legal authority, secure the home, save papers and records, sort everything into five groups, and get help for heavy or time-sensitive jobs.
Most cleanouts happen after a death, but they also come up after a move to assisted living, a divorce, or a foreclosure. In many cases, I need 60 to 90 days to sort the property without burning out, while a hired crew may clear a standard 3-bedroom home in 4 to 8 hours once sorting is done.
Here’s the short version:
- Start with legal authority before removing anything
- Secure the property by changing locks, forwarding mail, and checking insurance
- Photograph each room to keep a record
- Pull out papers first, including wills, deeds, tax returns, IDs, and account info
- Sort room by room into Keep, Sell, Donate, Recycle, or Dispose
- Check hidden spots like books, coat pockets, freezers, and boxes for cash, jewelry, or family items
- Use proper drop-off sites for e-waste, paint, chemicals, batteries, and medications
- Call a junk removal crew if the house is packed, the items are heavy, or the deadline is tight
If I had to boil the whole process down to one rule, it’s this: don’t start by hauling stuff out – start by protecting the estate, the records, and the people involved.
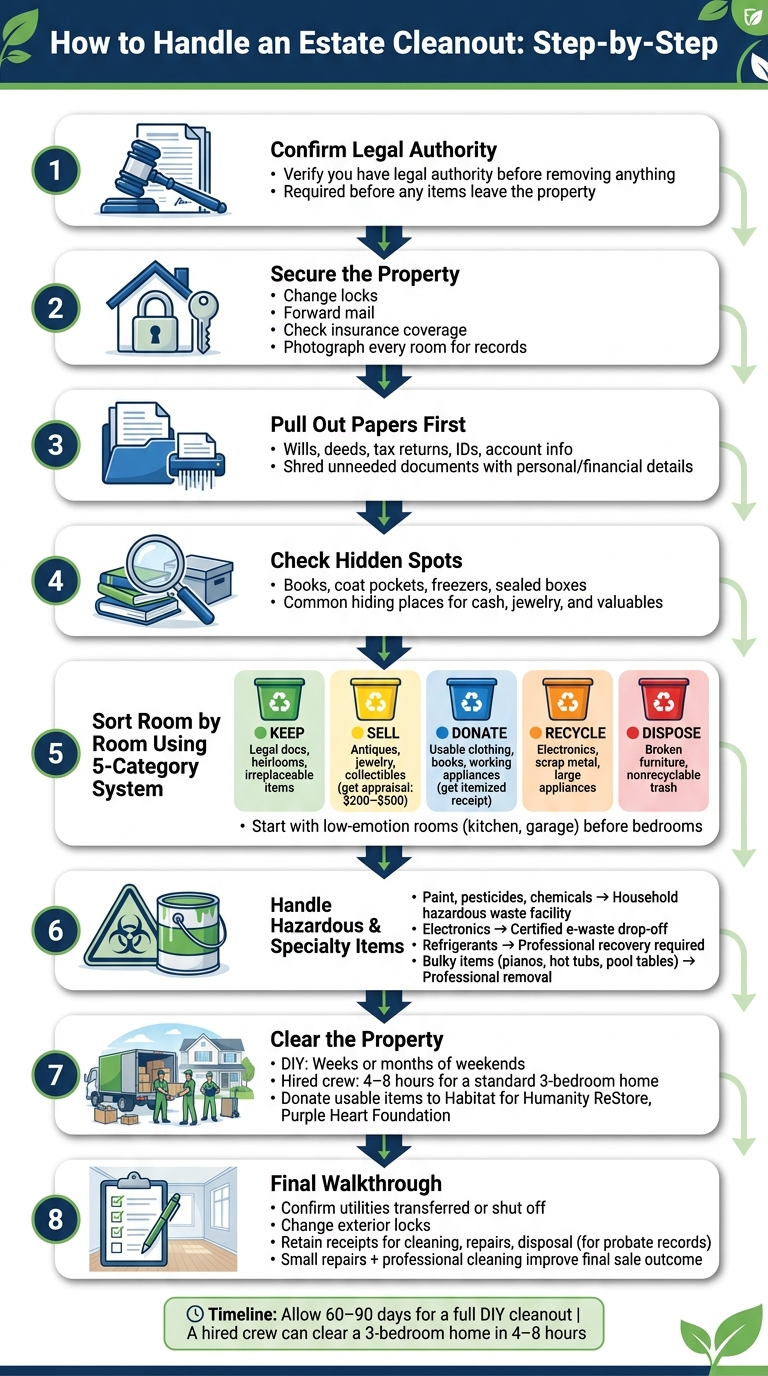
Estate Cleanout Step-by-Step Process: From Legal Authority to Final Walkthrough
Estate Cleanout Tips: How To Remove Items From A House After Death
sbb-itb-096ce5b
Use a Keep, Sell, Donate, Recycle, or Dispose System to Stay Organized
Once the paperwork is secure, it’s time to sort. A five-part system – Keep, Sell, Donate, Recycle, or Dispose – gives every item a clear next step. That matters because “maybe” piles can eat up hours and stall the whole job. The aim is to make decisions fast and keep usable items out of the landfill.
Before you begin, gather:
- Clear plastic bins
- Heavy-duty trash bags
- Colored tape or stickers
- Permanent markers
- Work gloves
Assign one color to each category: green for Keep, yellow for Sell, blue for Donate, orange for Recycle, and red for Dispose. You can also use labeled tarps or set aside specific rooms as staging zones so nothing gets mixed together. A simple spreadsheet or an app like Sortly or EstateExec can help you track each item, its category, and its estimated value as you go.
Set Clear Rules for What Goes in Each Category
Keep should be limited to legal documents, family photos, heirlooms, and anything you can’t replace. Sell is the right fit for antiques, jewelry, collectibles, and mid-century furniture. But don’t guess on price. It’s smart to get a professional appraisal first. Appraisals usually cost $200 to $500 and can flag items worth much more [2].
Donate makes sense for usable clothing, books, working appliances, and other household goods. Be sure to get an itemized receipt from the charity, since the IRS requires detailed records for non-cash charitable contributions [3][2]. Recycle covers electronics, scrap metal, and large appliances. Dispose is for broken furniture and nonrecyclable trash. Medications and hazardous chemicals should go through approved disposal channels.
If family members need time to decide, set a firm deadline for claiming Keep items. After that, anything left should move to Sell or Donate so the process doesn’t get stuck.
Work Room by Room to Avoid Getting Overwhelmed
Go room by room. Start with lower-emotion spaces like the kitchen, pantry, laundry room, or garage. That gives you some early momentum before you move into bedrooms or more personal areas.
Clear out obvious trash right away – expired food, old toiletries, and mismatched plastic containers are easy wins. Finish one room before you start the next. Then take a photo of the empty space. It’s a simple trick, but it helps you see progress when the job starts to feel heavy.
Comparison Table: How to Choose the Right Category for Each Item
| Category | Time Required | Financial Return | Emotional Difficulty | Landfill Impact |
|---|---|---|---|---|
| Keep | High | None | Very High | None |
| Sell | Very High | High ($) | Moderate | None |
| Donate | Moderate | Low (Tax Deduction) | Low to Moderate | None |
| Recycle | Moderate | None | Low | Low |
| Dispose | Low | None | Low | High |
Next, use the same system for furniture, clothing, books, appliances, and oversized items.
How to Handle the Most Common Estate Cleanout Items
Furniture, Clothing, Books, Appliances, and Electronics
Now use that same sorting system on the stuff that usually eats up the most time and floor space.
Furniture – like couches, dining tables, and dressers – may be worth selling if it’s solid, antique, or still in good shape. On the other hand, particle-board pieces, stained mattresses, and broken furniture aren’t good donation items. Those should go in the disposal pile.
Clothing and linens are usually simple to deal with. If they’re clean and still usable, bag them up for a local donation center. If pickup is offered in your area, schedule it early so the bags don’t sit around for days.
Books can sneak up on you. A few boxes may not seem like much, but books get heavy FAST. Donate usable copies to a library, thrift store, or shelter that accepts them.
For appliances, the big factor is whether they still work. A working washer or refrigerator may be a fit for donation or resale. A broken unit should go to a proper recycling facility. Refrigerators need extra care because they contain refrigerants that must be professionally recovered.
Electronics like TVs and computers shouldn’t go out with regular trash. Take them to a designated e-waste drop-off or a certified recycling center.
Garages, Sheds, Attics, and Bulky Items Like Hot Tubs and Pianos
Garages, sheds, and attics often hold the biggest pile of landfill-bound material. Still, plenty of items in those spaces can be reused or recycled.
Tools and yard equipment in good condition can be kept, sold, or donated if they’re still usable. Old paint, pesticides, and pool chemicals are a different story. Take those to a local household hazardous waste facility, and do not put them in standard trash. [2]
Attics can be especially messy. They often hide old storage boxes, worn furniture, and stacks of papers that haven’t been touched in years. Wear an N95 mask and heavy-duty gloves before you start. Dust, mold, and pests are common up there.
And don’t toss sealed boxes without checking them first. That’s often where people find financial records, old photos, and valuables that slipped out of sight.
Bulky specialty items require specialized removal. Hot tubs, pianos, and pool tables usually need pros because they’re heavy, awkward, and easy to damage – or use to hurt yourself – during a move. If something is too large, too heavy, or too tricky to move safely, eco-friendly haul-away services are the next move.
Comparison Table: Best Disposal Path for Major Item Categories
The chart below shows common item categories and their usual disposal path. [1]
| Item Category | Best Next Step | Special Handling |
|---|---|---|
| Furniture | Donate (if functional), dispose (if broken) | Mattresses may require separate disposal |
| Appliances | Donate (if working), recycle (if broken) | Refrigerants must be professionally recovered |
| Clothing & Linens | Donate | Textile recycling available for worn items |
| Books | Donate | Paper recycling for damaged copies |
| Electronics | Recycle | E-waste drop-off or certified recycling center required |
| Yard Waste | Compost or green waste facility | Do not mix with household trash |
| Bulky Specialty | Professional removal | Disassembly or specialized equipment often required |
Cut Landfill Waste and Use Green Light Junk Removal When It Makes Sense
Pick Eco-Friendly Disposal Options for Usable and Recyclable Items
Once your keep, sell, donate, recycle, and trash piles are set, the next job is simple in theory and messy in practice: get everything out while sending as little as possible to the landfill.
Start by keeping usable items, recyclables, and hazardous materials out of the trash stream. A careful sort can divert a big share of the load.
Usable items still have a second life. Habitat for Humanity ReStore accepts building materials and appliances, and the Purple Heart Foundation often offers free home pickup for furniture and household goods [3][7]. If you donate, get itemized receipts for your tax records.
Hazardous items need extra care. Take paint, pesticides, solvents, bulbs, and batteries to a household hazardous waste facility. Don’t toss them in standard trash, and don’t pour them down a drain [3][7][8].
When to Call Green Light Junk Removal for Estate Cleanouts and Large Items
Sometimes a cleanup crosses the line from doable to too much. When the volume is big, the items are heavy, or the clock is ticking, hiring a crew is often the fastest way forward.
This tends to matter most with large properties or hard deadlines tied to probate or closing. In those cases, time isn’t just money. It’s peace of mind.
Green Light Junk Removal handles estate cleanouts, storage units, appliance removal, yard cleanup, demolition debris, and bulky items such as hot tubs, pianos, and pool tables. A crew can usually clear a standard 3-bedroom home in 4 to 8 hours [5]. That can make a huge difference when you need the property ready by a set date.
They also send usable furniture and household goods to local charities and take recyclables to the proper facilities [5][2]. So you’re not stuck figuring out where everything goes while trying to meet a probate or closing deadline.
Comparison Table: DIY Hauling vs. Hiring Green Light Junk Removal
| Feature | DIY Hauling | Green Light Junk Removal |
|---|---|---|
| Time Commitment | Weeks or months of weekends [1][5] | 4–8 hours for a standard home [5] |
| Physical Effort | High; risk of back injuries and property damage [6] | Low; crew handles all heavy lifting and loading [1][9] |
| Safety | Risk of exposure to mold, pests, or chemicals [4] | Trained in safety protocols and biohazard handling [4] |
| Bulky/Specialty Items | Requires truck rental and multiple helpers [6] | Equipped for pianos, hot tubs, and large appliances [1][6] |
| Hoarder-Level Clutter | Often emotionally and physically overwhelming [1] | Experienced in sensitive, high-volume situations [1][2] |
With the property cleared, the last task is a quick finish check before turnover.
Conclusion: A Clear Plan for Clearing the Property with Less Stress
Start by confirming legal authority. Then lock down sensitive paperwork before anything leaves the house. Shred any unneeded documents with personal or financial details before the cleanout starts. Once authority is in place, you can begin sorting.
Go room by room and use the Keep, Sell, Donate, Recycle, or Dispose system. It keeps the process simple and helps you make decisions without getting stuck. Put donation and recycling first when you can, so usable items don’t end up in the landfill.
After sorting, the next step is getting everything out of the property safely and on schedule. If you’re dealing with a large amount of stuff, heavy pieces, or a tight deadline, call Green Light Junk Removal to clear the property fast, donate and recycle what can be diverted, and leave it broom-clean.
Once the home is empty, do one last pass with your original checklist. Confirm utilities have been transferred or shut off, and change exterior locks [3][2]. Hold on to receipts for cleaning, repairs, and disposal for probate records and beneficiary updates. Small repairs and a professional cleaning can help the final sale outcome, leaving you with a cleared, documented, ready-to-transfer property and less waste along the way.
FAQs
What if I can’t find the will or key documents?
If you can’t find the will or other key estate papers, talk to an estate attorney first. If there isn’t a will, the probate court can appoint an administrator who has the same authority as an executor.
Gather official records like deeds, bank statements, and tax returns, and store them in a safe place until the person with legal authority can review them. Be careful with these documents so they don’t get lost or used for identity theft.
How do I handle disagreements over what to keep?
Start with a clear, objective process: confirm legal authority, make a written inventory, notify all heirs, and record who wants which items. It also helps to set a claim deadline so the process doesn’t drag on.
If the will doesn’t address certain items, use a first-pick rotation. If disputes continue, try drawing straws, a buyout, or bringing in an objective third party to help lower tension.
When should I hire estate cleanout help?
Hire professional help when the cleanout feels too big, unsafe, or just plain hard to handle by yourself. It also makes sense if you’re up against a tight deadline, have physical limits, live out of town, or feel frozen by the emotional weight of it all.
Pros can also step in when you’re dealing with heavy furniture, appliances, hoarding situations, or disposal rules that get messy fast and may come with fines.