Cleaning a hoarder home is a complex and demanding task that goes beyond simple decluttering. It involves addressing safety hazards, emotional challenges, and logistical hurdles while respecting the dignity of the person involved. Here’s a quick summary of the key points:
- Understand the Risks: Hoarder homes often have fire hazards, structural damage, and biohazards like mold, pests, and decaying materials.
- Plan Before You Start: Assess the property, set achievable goals, and determine whether professional help is needed based on the severity (Levels 1–5).
- Safety First: Use proper protective gear (e.g., N95 masks, gloves) and address immediate dangers like blocked exits or biohazards.
- Sorting and Decluttering: Use methods like the Four-Box Sorting System (Keep, Donate, Recycle/Trash, Unsure) and focus on non-sentimental areas first.
- Deep Cleaning: Clean top-to-bottom using HEPA vacuums, disinfectants, and steam cleaners to eliminate lingering hazards.
- Eco-Friendly Disposal: Donate usable items, recycle where possible, and handle hazardous materials responsibly.
- Maintain Organization: Set up storage solutions, establish daily and weekly cleaning routines, and involve the whole family to prevent relapse.
For severe cases (e.g., biohazards, structural risks), professional cleanup services are recommended to ensure safety and efficiency. With the right approach, families can restore safety and functionality to a hoarded home while supporting their loved ones.
How A "Hoarder’s House" Is Deep Cleaned | Deep Cleaned | Insider
sbb-itb-096ce5b
What is Hoarding and What Risks Does It Create?
Hoarding disorder is a recognized mental health condition that goes well beyond typical clutter or collecting habits. In 2013, the American Psychiatric Association officially classified it as a distinct disorder. It’s defined by a persistent difficulty in discarding possessions, an overwhelming need to save items, and significant distress when parting with them [12]. This condition affects an estimated 2%–6% of the population and tends to worsen with age [10]. Unlike collectors who organize and display their items, individuals with hoarding disorder amass belongings in ways that often render living spaces unusable [10].
The disorder is three times more prevalent in adults over 54 compared to younger individuals [11]. Additionally, over 60% of those with hoarding disorder face other mental health challenges, such as major depressive disorder, generalized anxiety disorder, or social phobia [11].
A majority – about two-thirds – of individuals with hoarding disorder experience compulsive urges to acquire more items, even when they lack space to store them [10]. This leads to homes where key areas like kitchens, beds, or entire rooms are no longer functional. As the Cleveland Clinic puts it:
"Hoarding disorder is a mental health condition – it’s not a matter of laziness or willpower" [12].
These risks highlight the need for a thorough and well-structured cleanup plan.
Safety Hazards in Hoarder Homes
Homes affected by hoarding often pose serious physical dangers. Excessive clutter – such as piles of paper, cardboard, and fabric – not only serves as fuel for fires but also blocks emergency exits and narrows pathways, making escape and rescue efforts more difficult [13]. Hidden hazards like overloaded outlets or damaged wiring further increase the risk of fires.
Structural issues are another concern. The sheer weight of accumulated items can strain floors, leading to sagging or even collapse. Moisture trapped by clutter can cause wood rot, mold growth, and other forms of damage that compromise the building’s stability. Poor ventilation, combined with dust, mold spores, and animal dander, can also trigger respiratory problems like asthma and allergies.
Biohazards are common in hoarded homes as well. Rotting food, animal or human waste, and used medical supplies can harbor dangerous bacteria, such as E. coli and Salmonella, and spread diseases like hantavirus [13]. These conditions also attract pests like rodents, cockroaches, and insects, creating unsanitary environments. On top of that, clutter increases the risk of trips and falls, especially for older adults. Tackling these hazards is a critical first step in creating a safe and livable space.
Why You Need a Planned Approach
Given the risks, a well-thought-out cleanup plan is essential. Diving into a hoarder home without preparation can worsen the situation. A systematic approach prevents the "onion-peeling" effect, where unexpected layers of hazards and clutter overwhelm the process. Without proper handling, cleanup costs can increase by up to 80% due to mishandling hazardous materials and incomplete decontamination [2].
The process should start with a professional assessment to gauge the severity of the hoarding. Hoarding levels range from Level 1 (light clutter with all areas accessible) to Level 5 (severe biohazards, structural risks, and no safe pathways) [7]. Homes at Levels 4 and 5 require immediate professional intervention, as DIY efforts may not be safe or effective [2][8]. While restoring a hoarded home typically takes 3 to 5 days of intensive work, using systematic sorting methods can cut cleanup time by about 40% [8].
Planning also helps protect emotional well-being, which is key to a successful cleanup. As Mind explains:
"The important focus should be the safety and wellbeing of the person. This can be achieved without completely clearing everything. This is sometimes called a ‘harm reduction strategy’" [6].
The initial goal should be to clear pathways to all exits and restore at least one functional bathroom and sleeping area. Aiming for a complete clean-out too quickly can trigger panic, loss of trust, and even relapse [5].
How to Plan Your Hoarder House Cleanup
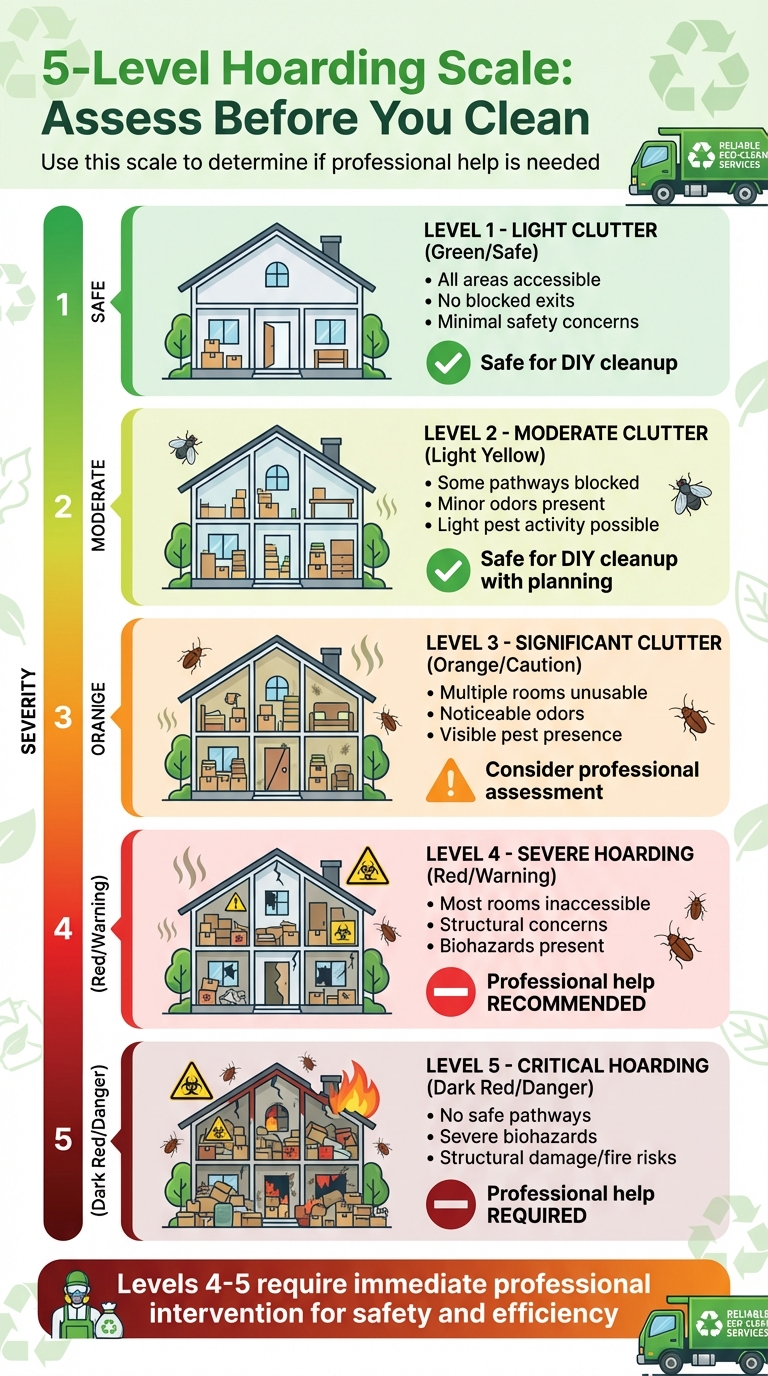
5-Level Hoarding Scale Assessment Guide for Cleanup Planning
A clear plan can make all the difference when tackling a hoarder house. It helps reduce risks, control costs, and protect both your time and well-being. Here’s how to prepare effectively.
Assess the Property First
Start with a quick walkthrough – 10 to 15 minutes is enough – to spot any immediate dangers like blocked exits, biohazards, structural damage, or pest infestations [5]. These hazards need to be addressed before diving into the cleanup.
Use the 5-level hoarding scale to evaluate the severity of the situation. This will help you decide if professional help might be necessary [5][14]. Also, check if the property has working water and electricity – both are essential for cleaning and safety [9][14].
Before you begin sorting, try to locate and secure important documents such as deeds, wills, or IDs. Doing this early can save you from having to sift through every piece of paper later [16]. Once hazards are noted, set realistic goals to keep the process manageable.
Set Achievable Goals and Timelines
For the first week, aim for a small but meaningful milestone, like clearing one exit path and ensuring one functional bathroom [5]. This approach keeps the momentum going and prevents burnout.
Divide the cleanup into phases using the 3-Layer Method. Start by clearing pathways and exits, then focus on creating a "safe zone" like a bedroom, and finally expand outward, tackling one area at a time [5]. Bathrooms are a good starting point since they typically hold fewer sentimental items, making them easier to clean quickly [14][15].
Stick to short work sessions – 45 to 90 minutes – with regular breaks. Sorting through possessions can be emotionally draining, and overworking can lead to poor decisions and exhaustion [5].
If the project feels overwhelming or unsafe, it might be time to consider professional hoarding cleanup services.
Should You Hire Professional Help?
DIY cleanup is usually manageable for Level 1 or Level 2 hoarding situations. However, for Levels 4 and 5, professional intervention is often essential [5]. Set a "hard stop" rule: if you encounter hazards like human or animal waste, extensive mold, pest infestations, used medical needles, or structural damage, stop immediately and call in experts [5].
Professional services are particularly important when legal deadlines – such as city inspections, landlord requirements, or eviction notices – are involved [4][5]. They’re also invaluable when emotional challenges or physical limitations, like respiratory issues, make it unsafe for family members to continue [1][4].
As Jim Stogiannos explains:
"Hoarding cleanup is not the same as junk removal, deep cleaning, or decluttering. It’s a process that sits at the intersection of mental health, physical safety, housing stability, and human dignity" [5].
If you’re unsure whether to proceed on your own, it’s better to err on the side of caution. Professional crews are equipped with the tools, training, and experience to safely handle hazardous conditions. For an added bonus, look for services that prioritize eco-friendly waste disposal to reduce environmental impact.
Tools and Equipment You’ll Need
When tackling a hoarder home, having the right tools isn’t just convenient – it’s essential for your safety and efficiency. These spaces can harbor hidden dangers like mold, sharp objects, and even biohazards, so preparation is key.
Protective Gear
Start with protective gear that shields you from potential hazards. N95 masks are great for filtering dust, mold spores, and small particles, but if there’s a risk of lead or asbestos exposure, upgrade to P100 respirators. Don’t forget heavy-duty nitrile or work gloves – doubling them up can provide extra protection against biohazards. Safety goggles are a must to guard your eyes from chemical splashes or flying debris.
Footwear matters, too. Wear closed-toe boots with puncture-resistant soles and good traction. If the situation is severe, consider disposable coveralls (like Tyvek suits) and even a hard hat for added protection. As cleanup pro Crystal Green puts it:
"Protection isn’t optional – it’s your first line of defense against the unknown." – Crystal Green
And don’t overlook a first aid kit. Keep it stocked and within reach for quick treatment of cuts or scrapes.
Cleaning and Sorting Supplies
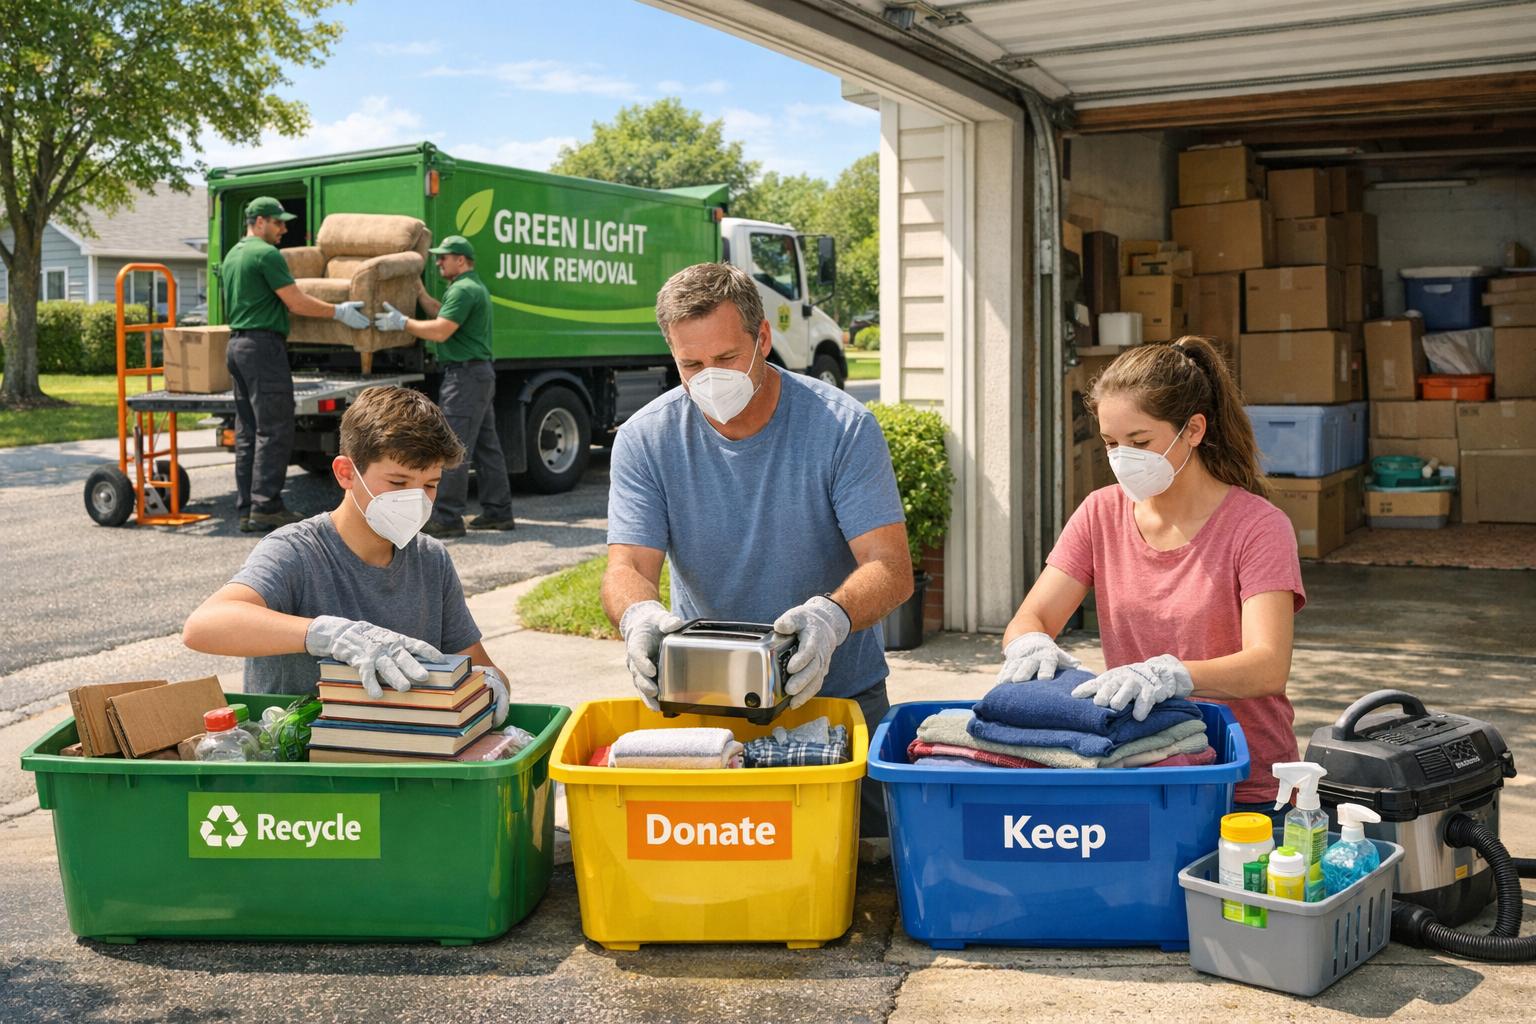
Once you’re suited up, gather your cleaning and sorting essentials. Heavy-duty trash bags are a must – they can handle sharp or bulky debris without tearing. To stay organized, use color-coded bins: green for items to keep, blue for donations, yellow for recyclables, and red for trash. Clear plastic containers are another great option, as they allow you to see what’s inside at a glance.
For cleaning, an industrial HEPA vacuum is invaluable for capturing fine particles. Have mops, buckets, brooms, sponges, and microfiber cloths ready for deep cleaning after decluttering. A simple yet effective disinfectant solution is one part bleach to nine parts water, while enzymatic cleaners work wonders on organic messes like bodily fluids before disinfecting.
Set up a staging area with tarps to sort through items efficiently. Use permanent markers and labels to clearly mark boxes and bins. If you encounter biohazards, dispose of them properly using red hazmat bags for contaminated materials and puncture-proof containers for sharp objects like needles or broken glass. Finally, keep headlamps or flashlights handy for poorly lit areas – they’ll make a world of difference.
How to Sort and Declutter Effectively
Once you have your supplies ready, it’s time to dive into sorting. The key is to use a system that keeps you from getting bogged down by individual items.
Use the Four-Box Sorting Method
The Four-Box Method is a straightforward way to organize. Set up four boxes labeled: Keep, Donate/Sell, Recycle/Trash, and Unsure. Each item you handle should immediately go into one of these boxes – no setting things aside for later or second-guessing.
To stay efficient, follow the One-Touch Rule: decide what to do with an item the first time you pick it up and place it in its designated box. Research shows that structured methods like this can cut cleanup time by up to 40% compared to more random approaches [2]. As you sort, focus on donating and recycling whenever possible to reduce waste.
The Unsure box is especially important if you’re dealing with items that bring up strong emotions or anxiety. Place those items in the Unsure box and keep moving. You can revisit them later with a clearer mind. As James Lee, Founder of TheHomePicker, puts it:
"Decluttering isn’t about getting rid of things. It’s about deciding what stays" [18].
Here’s a quick guide for what goes in each box:
| Box Label | What Goes In |
|---|---|
| Keep | Items you’ve used in the past year that have a specific place in your home |
| Donate/Sell | Items in good condition that you no longer need but could help someone else |
| Recycle/Trash | Broken, expired, or duplicate items, as well as hazardous materials |
| Unsure | Items that require more thought or belong in another room |
To avoid burnout, work in short blocks of 20 to 45 minutes, taking breaks in between.
Begin with Non-Personal Spaces
After sorting, start decluttering in areas that aren’t emotionally charged. Avoid diving into sentimental spaces like bedroom closets right away. Instead, focus on functional areas like the kitchen or bathroom. These spaces often have practical items – like expired medications, old toiletries, or duplicate cleaning supplies – that are easier to part with. Tackling these first helps you build momentum and confidence.
Bathrooms are a great starting point. They’re usually smaller and filled with items that are clearly disposable, like empty bottles or expired products. Kitchens are another good option. Begin with obvious clutter like expired food, broken utensils, or tools you never use. Clearing these spaces creates visible progress, which can be incredibly motivating. As Jim Stogiannos, author of Junk Removal 365, reminds us:
"Hoarding cleanup isn’t about perfection. It’s about making the space a little safer than it was before – and that’s enough" [5].
Leave storage-heavy spaces like basements, attics, and closets for later. These areas often contain sentimental or emotionally charged items and require more mental energy to handle.
Handle Emotional Difficulties
Sentimental items – like old love letters, a child’s artwork, or a family heirloom – can be the hardest to let go of. Often, the struggle comes from the fear that losing the item means losing the memory tied to it [19][20]. But the truth is, memories live within us, not in our belongings.
Take, for example, Joshua Fields Millburn’s experience in 2009. While clearing out his late mother’s apartment, he found four sealed boxes of old school papers that had been stored for 25 years. Realizing that memories didn’t depend on keeping every item, he digitized important photos and donated most of the rest, skipping the $1,600 U-Haul rental he’d planned for [20].
To help with tough decisions, try the "Fire Test": if losing an item wouldn’t cause deep regret, it’s likely just clutter. For items you truly want to remember, consider taking photographs to preserve the memory without keeping the physical object.
Another strategy is creating a "Memory Box" – a single container where you store sentimental items. Once the box is full, that’s your limit. If you want to add something, you’ll need to remove something else. This keeps sentimental clutter from growing unchecked. Rachel Jones, author of Nourishing Minimalism, offers this advice:
"Keep in mind that the past is not the present… Holding onto the past makes the present joy much more difficult to see and embrace" [19].
If you’re stuck, place the item in the Unsure box with a plan to revisit it in three to six months. If you haven’t missed it by then, it’s probably safe to let it go. Studies show that without a maintenance system, 80% of decluttering progress can backslide within six months [18]. Building strong decision-making habits is essential.
Once you’ve worked through these emotional challenges, you’ll be ready to move on to cleaning and organizing your newly decluttered spaces.
Deep Cleaning After Decluttering
Clearing out clutter is just the beginning – hidden issues like bacteria, pests, mold, and odors often stick around even after the mess is gone [21]. Deep cleaning turns the space into a healthier, more comfortable place to live. A systematic top-to-bottom approach ensures you don’t undo your progress by re-contaminating areas.
Clean from Top to Bottom
Always start high and work your way down to avoid spreading dirt onto already-cleaned surfaces [21][17]. Begin with ceiling fans, light fixtures, and the tops of cabinets. Then, move on to walls, countertops, and finally, the floors.
Sweep or vacuum any leftover debris [21]. Pay extra attention to high-touch areas like doorknobs, light switches, and handles by sanitizing them with a hospital-grade disinfectant or a bleach solution (1:9 ratio). Let the solution sit for 10 minutes before wiping it off [21][17]. For carpets, curtains, and upholstery, steam cleaning is a great option if they’re worth saving. Severely soiled items that may harbor bacteria should be discarded [21][15]. Keep windows and doors open, and use fans to create airflow. This helps clear out dust, mold spores, and any lingering chemical fumes [17].
Once this initial cleaning is done, you’re ready to bring in specialized tools for deeper sanitation.
Use Professional-Grade Cleaning Equipment
When dealing with deeply embedded grime or potential hazards, standard cleaning tools often aren’t enough. A HEPA vacuum is a must-have for removing fine dust, allergens, and mold spores without spreading them back into the air [21]. For tougher stains and porous surfaces, a steam cleaner uses high heat to break down dirt without relying heavily on chemicals [21][17]. Choosing tools that are both effective and environmentally conscious can make a big difference.
| Essential Cleaning Equipment | Purpose |
|---|---|
| HEPA Vacuum | Captures fine dust, allergens, and mold spores from surfaces and the air [21] |
| Steam Cleaner | Cleans carpets and tackles hard-to-reach grime using high heat [21][17] |
| Hospital-Grade Disinfectant | Kills bacteria and viruses on frequently touched surfaces [21] |
| N95 Mask/Respirator | Protects against airborne dust and pathogens [17] |
| Mold-Killing Sprays | Targets and removes fungal growth on walls and floors [21] |
Make sure to wear full protective gear, including an N95 mask or respirator, heavy-duty gloves, safety goggles, and closed-toe shoes, to shield yourself from potential hazards [21][17]. If you encounter issues like black mold, structural damage, or biohazards (e.g., human or animal waste), stop immediately and call in professional biohazard specialists [15][5]. Some situations are simply too risky to handle on your own.
After cleaning the main surfaces, inspect for hidden problems like water leaks, electrical issues, or sagging floors that may have been concealed by the clutter [15][3][5]. To eliminate lingering odors, use HEPA air purifiers and natural deodorizers like activated charcoal or baking soda [21]. If you notice signs of pests such as rodents or insects, pause work in those areas until pest control has resolved the issue to avoid spreading the infestation [5].
Eco-Friendly Disposal and Junk Removal
Once you’ve tackled the deep cleaning process, the next step is figuring out how to handle leftover items responsibly. Tossing everything into a landfill wastes resources and harms the planet. Thankfully, top eco-conscious junk removal services can recycle or donate nearly 80% of the materials they collect from homes [24]. By combining your sorting efforts with sustainable disposal practices, you can ensure that every item is handled in the most responsible way possible.
Donate Items in Good Condition
One of the best ways to give your items a second life is through donation. Items like gently used furniture, clothing, appliances, books, and kitchenware can often be passed on, provided they’re clean, functional, and no longer hold sentimental value. If you’re struggling to part with something meaningful, consider preserving the memory with a photograph before donating.
Many organizations offer free pick-up services for larger donations, making the process much easier. However, if an item wouldn’t meet a basic inspection for cleanliness or usability, it’s better to discard it.
"Partnering with a donation center or local charity can also provide a sense of closure. Knowing that items are going to families in need helps transform the process from a burden into a meaningful act." – CCR-Mag.com [23]
Recycle and Handle Hazardous Materials Properly
For items that aren’t suitable for donation, recycling is the next best option. Paper, plastics, metals, and electronics can often be dropped off at designated recycling centers. Be sure to follow local guidelines, especially for electronics, as some states, like Massachusetts, have bans on disposing of certain electronics in regular trash [24].
Hazardous materials require special attention. Items like batteries, paint, gasoline, household chemicals, and biohazards (such as mold, animal waste, or human waste) should only be handled by certified professionals or taken to designated disposal sites.
"The unsafe nature of hoarding cleanup make it strongly recommended that only adequately trained and certified… professionals remove and dispose debris." – Bio Hazard Plus [22]
Partner with Green Light Junk Removal

For a comprehensive and eco-responsible cleanup, professional services like Green Light Junk Removal can be a game-changer. They ensure that nearly 80% of the items they collect are recycled, donated, or repurposed [24]. Additionally, they work with local charities to ensure usable items benefit the community.
Their straightforward pricing and convenient online booking make them a practical choice for handling complex cleanouts. If you’re looking for an environmentally responsible way to tackle a hoarder house, professional help might be the way to go.
How to Stay Organized After Cleanup
Once you’ve transformed a hoarder house, the next big task is keeping it that way. Tackling the initial cleanup is a huge milestone, but maintaining the results requires ongoing effort. Without a plan, clutter has a sneaky way of creeping back in. The goal isn’t to achieve perfection – it’s about creating easy, manageable habits that stop clutter from building up in the first place. A good starting point? Rethink how you handle storage.
Add Storage Solutions
Everything in your home should have a designated spot. Use clear, labeled bins to make finding items simple and stress-free. Wall-mounted shelves, hooks, and pegboards can free up valuable floor space, while multifunctional furniture – like storage ottomans or beds with built-in drawers – offers hidden storage options without crowding your rooms. Near entryways, set up "drop zones" with trays for mail and keys, hooks for bags, and a shoe rack to keep items from scattering throughout the house. Here’s a pro tip: avoid cramming every shelf or bin to its limit. Leaving some empty space makes cleaning easier and helps the home feel more open and less overwhelming.
Build Daily and Weekly Cleaning Routines
Consistency is the secret to staying organized. Set aside 5–10 minutes each evening to tidy up. This could mean putting away stray items or sorting through the day’s mail. After meals, wash dishes and wipe down kitchen counters to keep surfaces clear and ready for use.
For weekly upkeep, pick a specific day to do a 30–60 minute "weekly sweep." Check surfaces for clutter, vacuum high-traffic areas, and deep clean one room, like the bathroom. Also, make sure all trash and recycling are taken out. A great habit to adopt is the "One In, One Out" rule: for every new item that comes into your home, let go of an old one. This keeps your belongings in check and prevents overcrowding.
| Frequency | Tasks | Time |
|---|---|---|
| Daily | Sort mail, nightly reset | 5–10 minutes |
| Weekly | Vacuum, deep clean one room, take out trash | 30–60 minutes |
| Monthly | Family reset day, review storage systems | 1–2 hours |
The key to success? Make it a team effort.
Get the Whole Family Involved
Keeping an organized home works best when everyone pitches in. Assign specific areas or "zones" to each family member, giving them clear responsibilities to maintain. To keep things fair, rotate these tasks weekly. Once a month, hold a "Family Reset Day." During this time, everyone works together to tidy shared spaces and reassess storage systems to ensure they’re still working well. Room-specific checklists can be helpful to make sure no area is overlooked.
When everyone shares the load, staying organized becomes less of a chore and more of a routine.
When You Need Professional Help
Some hoarder house situations are simply too risky or complex to handle on your own. Calling in certified professionals not only ensures safety but also helps you avoid costly mistakes. Research indicates that about 85% of DIY hoarding cleanup attempts fail without the proper emotional support and professional expertise [8].
Biohazards or Structural Damage
If you come across human or animal waste, used needles, medical waste, or rotting food, stop immediately [5]. These hazards aren’t just unpleasant – they’re dangerous. Handling them requires specialized equipment and training that go far beyond what standard cleaning supplies can manage. Certified professionals use industrial-grade protective gear, such as N95 respirators, safety goggles, and heavy-duty gloves, to safely deal with biohazards [8][25].
Structural issues are another red flag. Professionals can spot warning signs that might go unnoticed, like sagging floors, soft spots, blocked exits, or unstable piles. These could indicate that the building’s integrity is compromised and needs expert assessment [8][5]. Fire hazards, such as overloaded outlets or flammable materials stacked near heaters, also demand immediate professional attention. Hoarding is often rated on a scale from 1 to 5, and situations at Levels 4 or 5 – where most rooms are inaccessible or pathways are blocked – should always involve professional help [8][5].
Time Constraints or Overwhelming Emotional Challenges
Time is another factor that makes professional help critical. Certified cleanup teams can complete projects up to 70% faster than DIY efforts [26]. They often finish in one to three days, which is especially important when facing deadlines like inspections or evictions.
The emotional strain of hoarder cleanups shouldn’t be underestimated either. Professionals act as neutral mediators, helping to reduce family conflicts and power struggles that often arise during these situations [27][5]. Their training in hoarding psychology allows them to use compassionate, non-judgmental language, building trust with the individual involved. Including the person with hoarding disorder in decision-making can increase long-term success rates by 70% compared to forced cleanouts [8].
Green Light Junk Removal provides a comprehensive service, handling everything from arranging dumpsters to coordinating donation pickups. Their team understands that hoarder cleanups require a level of care beyond standard junk removal. They prioritize discretion by using unmarked vehicles to protect your privacy and are trained to identify structural risks that may need further attention. Plus, they emphasize eco-friendly disposal methods, aligning with the sustainable practices highlighted throughout this guide.
Conclusion
For families handling hoarder cleanups, the main objective is to create a safer and healthier living space. Achieving this requires thoughtful planning – starting with assessing potential hazards and setting achievable goals – while following a structured cleanup process. As LifeCycle Transitions wisely puts it, "Success isn’t measured by perfection but by progress toward a safer, more livable environment."
A proper cleanup not only reduces fire hazards and prevents structural damage but also eliminates pest infestations and promotes mental well-being. Simple habits, like a "one-in, one-out" rule or short daily tidying routines, can help maintain a clutter-free home and prevent the buildup from happening again. These small but impactful steps pave the way for responsible disposal methods that protect both your home and the environment.
Eco-conscious disposal plays a key role here. Donating usable items and recycling hazardous materials not only reduces waste but also encourages community responsibility and environmental care.
If the situation feels too overwhelming – whether due to biohazards, structural issues, or emotional strain – professional assistance can make all the difference. Companies like Green Light Junk Removal offer discreet, compassionate support tailored to hoarder cleanups. Their trained team brings the right tools and understanding to navigate the unique challenges families face during this process.
With the right resources and support, it’s possible to transform a cluttered, unsafe environment into a clean and organized home. By adopting these strategies, your family can reclaim a safe and functional living space.
FAQs
How do I know the hoarding level?
To gauge the level of hoarding, start by evaluating the extent of clutter and how it affects safety and health. Key indicators may include fire risks, mold growth, pest infestations, structural damage, or sanitation problems. Emotional struggles with letting go of possessions can also point to the seriousness of the issue. If the clutter compromises safety, interferes with daily life, or creates hazardous conditions, it may be time to seek professional assistance to assess and address the problem effectively.
What’s the safest first room to tackle?
When tackling a hoarder house, the best place to start is often a room that’s less emotionally charged and safer to work in – like the bathroom. Bathrooms tend to have less clutter compared to other areas, making them a practical starting point. Beginning here helps you ease into the process, avoid overwhelming hazards like biohazards, mold, or structural problems, and build some momentum for the larger cleanup ahead. This step-by-step method keeps the process safer and more organized.
What should never go in regular trash?
Items such as biohazards, mold, pests, and hazardous materials should never be thrown in regular trash bins. These items need specific disposal methods to ensure safety and prevent harm to both people and the environment. Always refer to your local regulations or reach out to professionals to handle and dispose of these materials appropriately.