Construction debris cleanup is more than just tossing waste into a dumpster – it’s about safety, cost efficiency, and following local laws. Here’s what you need to know:
- Debris Volume: Renovations generate 1–3 cubic yards of debris per 100 sq. ft. Gutting a 200 sq. ft. room? Expect 2–6 cubic yards.
- Sorting Waste: Separate clean materials like concrete or wood from mixed debris to cut costs. Mixed loads can cost $150–$250/ton, while sorted concrete may cost as little as $7.50/ton.
- Hazardous Materials: Homes built before 1980 may contain asbestos or lead paint. Testing costs $200–$800, far less than hefty fines or abatement fees ($1,500–$30,000).
- Local Rules: Permits may be required for dumpsters or recycling plans. Fines for non-compliance can reach $1,000/day in some areas.
For small projects, DIY may work. For larger jobs, consider professional services like Green Light Junk Removal to save time and effort while ensuring proper disposal.
Construction & Demolition Debris Management
sbb-itb-096ce5b
Know Your Construction Debris
Handling construction debris correctly can save money, reduce legal headaches, and make cleanup safer. Knowing what type of waste you’re dealing with before starting can streamline the process and help you stick to eco-friendly practices while staying compliant with regulations.
Common Types of Construction Debris
Construction waste generally falls into two main categories: clean debris (a single material like untreated wood or concrete) and mixed debris (a combination of materials like drywall, metal, and insulation). The difference is important because clean debris is cheaper to recycle, while mixed debris can cost 2–3 times more to dispose of [3].
Home renovation projects often generate materials like wood, drywall, roofing shingles, concrete, metal, insulation, and cardboard. Each material comes with its own disposal costs, recyclability, and weight, so sorting at the source is crucial.
| Material | Recyclable? | Weight per Cubic Yard | Disposal Cost (Approx.) |
|---|---|---|---|
| Concrete | Yes (95%+) | 4,050 lbs | $7.50/ton (recycled) |
| Scrap Metal | Yes (90%+) | 800–2,000 lbs | Free (or paid to you) |
| Untreated Wood | Yes (30–40%) | 300–500 lbs | $60–$100/ton |
| Drywall (Clean) | Yes (15–25%) | 500 lbs | $40–$80/ton |
| Mixed Debris | No | Varies | $150–$250/ton |
Important Tip: Materials like concrete, brick, and asphalt are extremely heavy. A 10-yard dumpster filled with these can exceed legal weight limits, leading to hefty overage fees. For these materials, specialized "low-boy" containers are often required [2][3].
Hazardous Materials and How to Handle Them
Not all debris belongs in a dumpster. Homes built before 1978 may have lead-based paint, while those constructed before 1980 could contain asbestos in popcorn ceilings, vinyl floor tiles, or pipe insulation. Testing for asbestos typically costs $200–$800, which is far less than the $1,500–$30,000+ price tag for professional abatement [3][4].
Other hazardous items include CCA-treated wood (containing arsenic), chemical solvents, adhesives, and mercury-containing products like old thermostats or fluorescent light tubes. These materials must be taken to specialized facilities. Putting hazardous waste in a regular dumpster can cause the entire load to be rejected or reclassified as hazardous, significantly increasing disposal costs [4].
How to Estimate Your Debris Volume
A simple guideline: expect 1–3 cubic yards of debris for every 100 square feet of renovation space, and always round up to avoid underestimating. For example, gutting a 200-square-foot bathroom could result in 2–6 cubic yards of waste. This estimate helps determine the right dumpster size or if a single professional pickup will suffice [5].
Understanding the types and volumes of debris you’re dealing with is essential for a safe, cost-effective, and compliant cleanup process.
How to Plan a Safe and Compliant Cleanup
Taking the time to plan your cleanup carefully can save you from fines, injuries, and unnecessary stress. Once you’ve identified the type and volume of debris you’re dealing with, the next step is creating a cleanup plan that prioritizes safety and follows legal guidelines. Cutting corners here can lead to costly mistakes, project delays, or even preventable accidents.
Check Local Rules and Permit Requirements
After determining your debris type, make sure your cleanup aligns with local regulations. Rules can vary significantly depending on your location, so it’s important to contact your local building or public works department for guidance. Some areas may require a Waste Recycling Plan (WRP) before issuing a building or demolition permit. This document outlines the materials you’ll generate and where they’ll be recycled. For instance, Riverside County mandates that at least 65% of nonhazardous construction materials must be diverted from landfills before a final inspection is approved [8].
If you need to place a dumpster on a public street or sidewalk, you’ll likely need a street space permit from your local Department of Public Works. Permit fees can range from $25 to $200, and approvals may take anywhere from 3 to 10 business days [3]. Ignoring these requirements can get expensive – violating construction debris ordinances in San Francisco, for example, can result in fines of up to $1,000 per day [7].
Here’s a tip many people overlook: keep all weight tickets and receipts from recycling facilities. Many municipalities require a final Waste Reporting Form to close out permits, and these documents serve as proof of compliance [8].
Safety Tips for Handling Construction Debris
Dealing with construction debris can be physically taxing and comes with hidden dangers, like sharp edges, heavy materials, and harmful dust particles. To stay safe, always wear the right protective gear.
| Required PPE | Why It Matters |
|---|---|
| N95 Mask / Respirator | Filters out drywall dust, silica, and insulation particles [5] |
| Steel-Toed Boots | Shields feet from falling objects and punctures from nails [5] |
| Cut-Resistant Gloves | Protects hands from cuts caused by glass, metal, or wood splinters [5] |
| Safety Glasses | Guards eyes against flying debris during demolition [5] |
In addition to wearing protective gear, take extra precautions like running a magnetic sweeper over the site after demolition. This simple step can pick up stray nails and screws, protecting tires, feet, and pets [6]. If you’re cutting materials like concrete or brick, use wet cutting or vacuum systems to minimize silica dust, which poses serious respiratory risks [3]. Finally, focus on organizing your site to make debris removal more efficient.
How to Organize Your Cleanup Site
A well-organized cleanup site saves time and money. Set up a designated debris zone close to the work area, and clearly label piles as you go – for example, "Metal", "Wood", or "Concrete" [6]. Keeping materials separated not only simplifies recycling but also prevents mixed-debris surcharges, which can cost $150–$250 per ton [3].
Instead of letting debris pile up, fill dumpsters gradually to maintain a safer and more manageable site [6]. For roll-off dumpsters, ensure there’s at least 60 feet of clear space for the truck to access the area. Double-check for any obstacles like overhead wires, trees, or fire hydrants that could block the pickup route [10]. Planning this ahead of time avoids last-minute headaches on delivery day.
Eco-Friendly Disposal and Recycling Options
Once you’ve staged your debris, the next step is minimizing landfill waste. This not only supports environmental conservation but also ensures compliance with strict U.S. waste disposal regulations. In 2018, the U.S. produced approximately 600 million tons of construction and demolition (C&D) debris – more than double the municipal solid waste generated that same year. Encouragingly, over 455 million tons of this debris were recycled or reused [11][12]. By adopting the right methods, your project can be part of this growing effort.
How to Sort Materials for Recycling
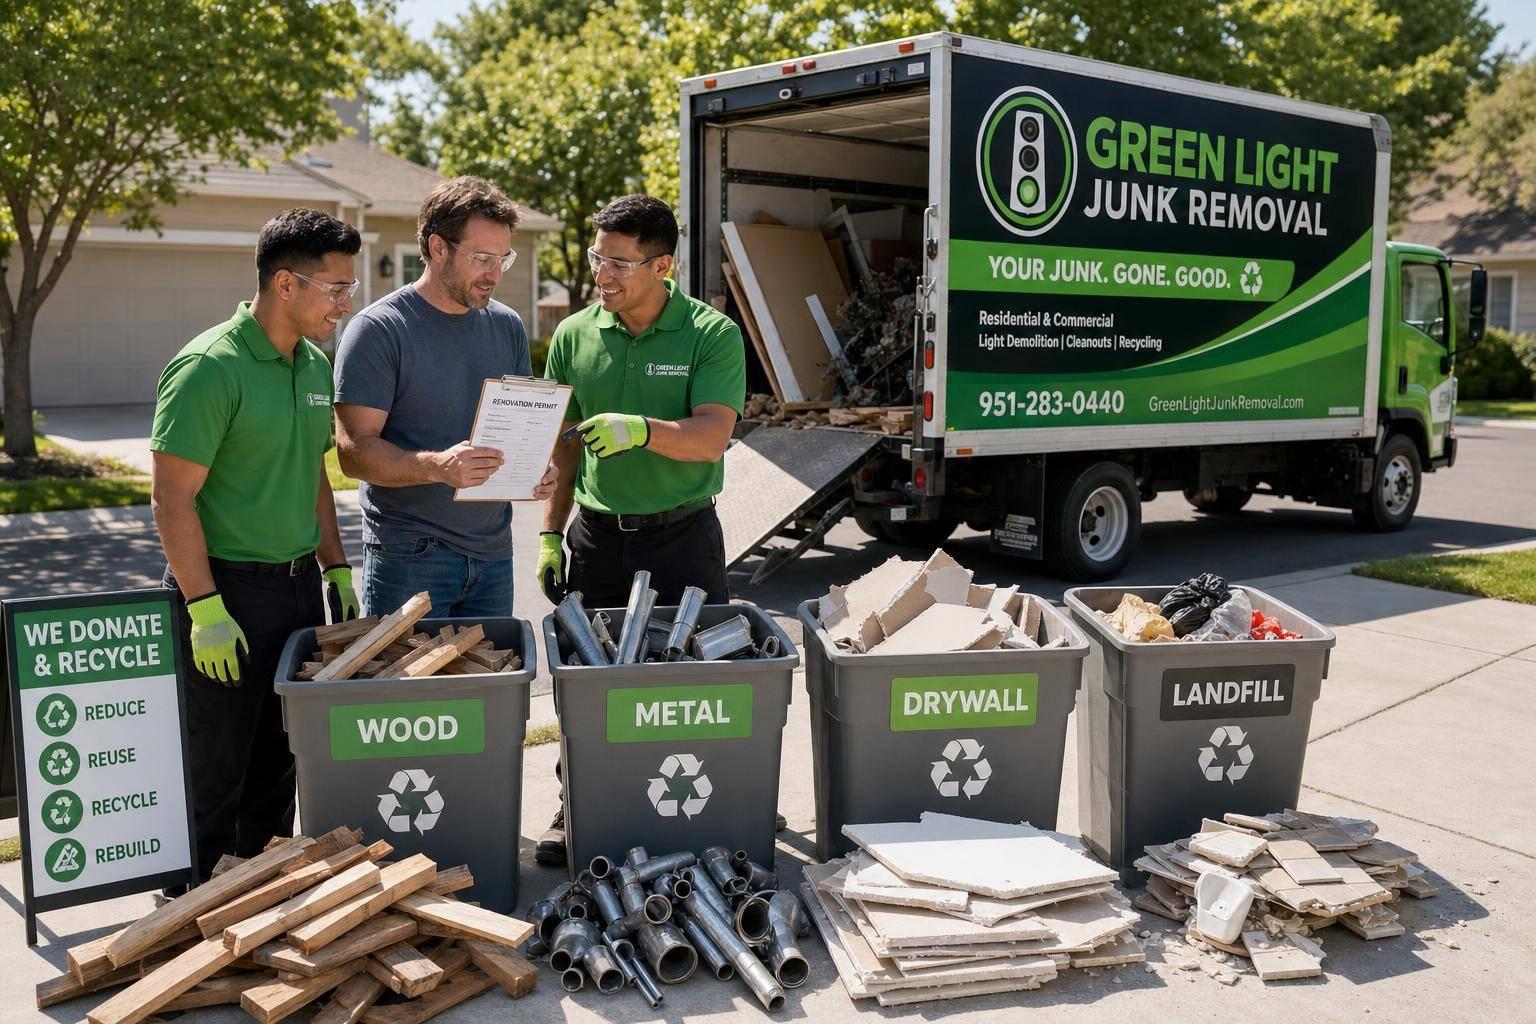
Sorting materials from the start is crucial. Once debris is mixed into a single pile, recovering recyclable items becomes nearly impossible [11]. From day one, set up clearly labeled areas for different materials – one for concrete, another for clean wood, and another for scrap metal, for example.
Keeping materials separated not only simplifies recycling but can also save you money. Recycling sorted loads typically costs $20–$50 per ton, compared to $30–$100 per ton for mixed debris [9]. Plus, sorted scrap metal can even generate income; steel recyclers often pay $0.07–$0.15 per pound for clean, sorted loads [9].
| Material | Recycling Method | Common Next Use |
|---|---|---|
| Concrete/Masonry | Crushing | Road base, driveway bedding, new concrete aggregate [11][12] |
| Wood (untreated) | Chipping/Milling | Mulch, compost, particle board, biomass fuel [11][12] |
| Steel/Metals | Melting | New metal products (recyclable indefinitely) [11][9] |
| Gypsum (Drywall) | De-papering/Crushing | Soil amendment or new drywall [12][9] |
| Asphalt Shingles | Crushing | Road base or new asphalt pavement [11][9] |
Additionally, save wood cutoffs from framing – they can be reused as blocking or lintels, cutting down on the need for new lumber [12].
How to Dispose of Hazardous Materials Safely
Hazardous materials require special handling and cannot be mixed with general C&D waste or thrown into standard dumpsters [13]. Items like asbestos-containing materials (ACM) and lead-based paint debris must be managed by licensed abatement contractors and sent to authorized hazardous waste facilities [13]. For residential projects, professional asbestos abatement typically costs $1,500–$3,000 [9]. Lead paint debris should be securely bagged and treated as regulated waste [9].
Furthermore, the EPA’s Renovation, Repair, and Painting (RRP) Rule applies to projects disturbing more than 6 square feet of interior or 20 square feet of exterior painted surfaces in homes built before 1978 [13]. Following these guidelines ensures hazardous materials are handled responsibly, aligning with your eco-conscious approach.
Green Light Junk Removal‘s Approach to Eco-Friendly Disposal
Green Light Junk Removal takes eco-responsibility seriously, offering a comprehensive disposal solution for all types of debris. Their team separates recyclables, donatable items, and general waste, streamlining the process and reducing the need for multiple trips. Items like cabinets, sinks, lighting fixtures, and tiles are donated to organizations such as Habitat for Humanity ReStores, giving them a second life. Meanwhile, raw materials like concrete, scrap metal, and untreated wood are sent to specialized recycling centers instead of landfills.
For homeowners who want an environmentally friendly solution without the hassle of researching local recycling facilities or hazardous waste drop-off sites, Green Light Junk Removal’s all-in-one service makes it easy to stay eco-conscious while saving time and effort.
DIY vs. Hiring a Professional: Which Is Right for You?
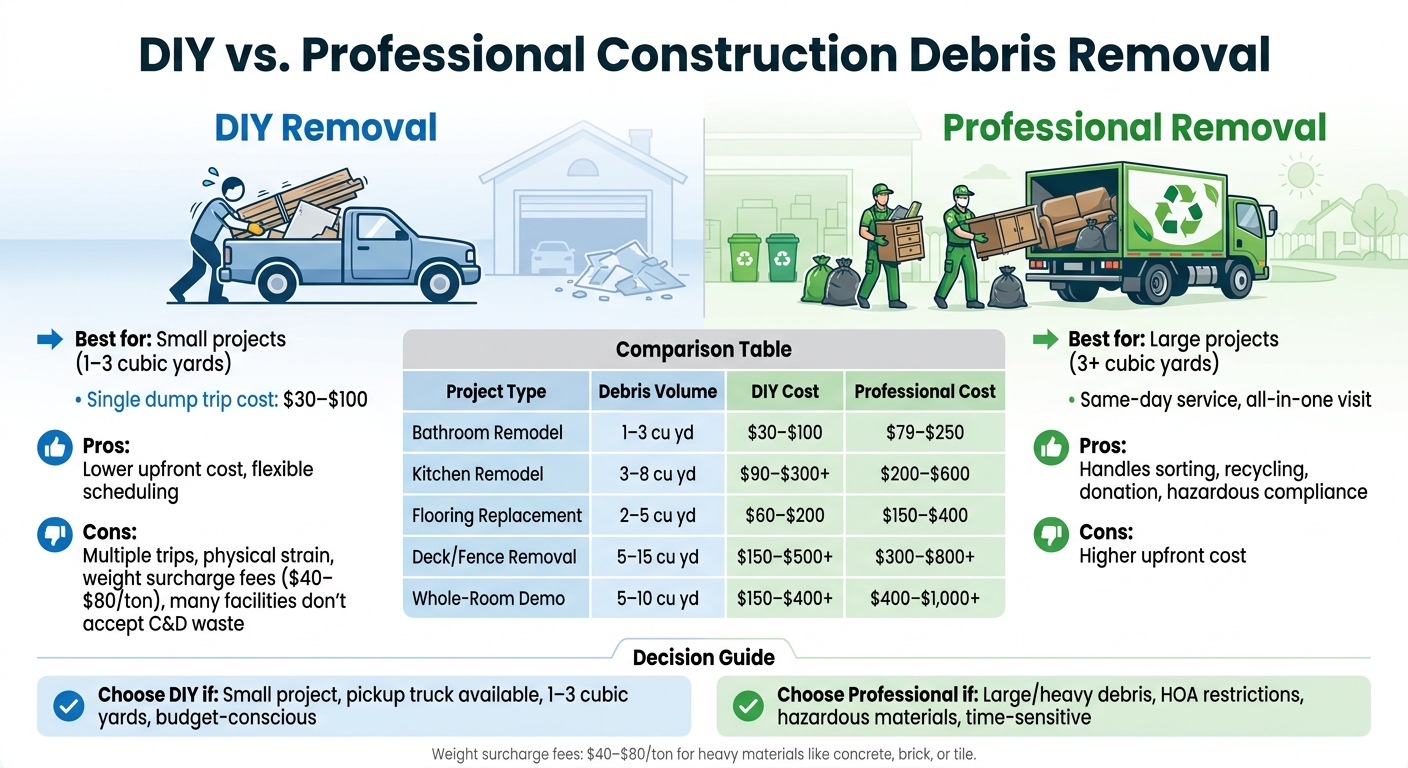
DIY vs. Professional Construction Debris Removal: Cost & Volume Comparison
Once you’ve sorted your debris, it’s time to figure out whether to handle the removal yourself or call in a professional. The choice largely depends on the size of your project, how much time you have, and your physical ability.
When DIY Debris Removal Makes Sense
DIY removal is perfect for smaller projects – like updating a bathroom, swapping out flooring, or replacing trim. If you’ve got access to a pickup truck, some free time on the weekend, and a manageable amount of debris (around 1–3 cubic yards), this option can help you save money. A single trip to the dump usually costs between $30 and $100, plus fuel costs [14].
Before you start, make sure to check the rules at your local disposal facility. Many municipal services don’t accept construction and demolition (C&D) materials at all [14]. Additionally, if you plan to use a private hauler, confirm their requirements before loading up your debris.
For anything beyond minor renovations, hiring professionals can save time and spare you the physical effort.
Why Hiring Green Light Junk Removal Is Worth It
For bigger projects – like kitchen remodels, deck tear-downs, or full demolition jobs – professional services offer clear advantages. Large amounts of heavy debris, such as concrete, brick, or tile, can lead to weight surcharge fees of $40–$80 per ton at dumpster rental facilities. Some landfills won’t even accept these materials during DIY drop-offs [14]. Plus, the strain of lifting bulky items, multiple trips to the dump, and potential injuries can quickly turn DIY into a headache.
Green Light Junk Removal takes care of everything – loading, transporting, and disposing of debris – all in one visit, often on the same day. Their team even sorts recyclables and items suitable for donation on-site, saving you the hassle. This is especially helpful for homeowners in HOA communities, where long-term dumpster placement is often prohibited. A fast, professional service can be the most practical solution in these cases [14].
Cost and Time: DIY vs. Professional Removal
Here’s a breakdown of costs to help you weigh your options for common projects:
| Project Type | Estimated Debris Volume | DIY Dump Trip Costs | Professional Removal Cost |
|---|---|---|---|
| Bathroom Remodel | 1–3 cubic yards | $30–$100 | $79–$250 |
| Kitchen Remodel | 3–8 cubic yards | $90–$300+ | $200–$600 |
| Flooring Replacement | 2–5 cubic yards | $60–$200 | $150–$400 |
| Deck/Fence Removal | 5–15 cubic yards | $150–$500+ | $300–$800+ |
| Whole-Room Demo | 5–10 cubic yards | $150–$400+ | $400–$1,000+ |
Sources: [14]
Another key consideration is time. DIY hauling can drag out the cleanup over several days, while professionals typically get the job done in a single visit. That means you can move forward with your project without delays. Regardless of which route you choose, make sure to follow eco-friendly disposal practices to keep your project as sustainable as possible. These cost and time factors are just one piece of the puzzle, and we’ll explore more as we continue through the project planning process.
Step-by-Step Debris Cleanup Guide for Homeowners
Here’s a practical guide to help homeowners tackle construction debris cleanup safely, efficiently, and responsibly.
What to Do Before the Project Starts
Getting ready before demolition begins can save you both time and money. Start by checking if you need permits and reviewing local disposal rules. Remember, many municipal services won’t pick up construction and demolition (C&D) waste from the curb [9][14].
Next, estimate how much debris your project will generate to decide on the best removal method. If your home was built before 1980, it’s a good idea to hire a licensed inspector to check for asbestos and lead paint before disturbing any materials. Testing typically costs $300–$500, which is far less than the $1,500–$3,000 you might spend on professional asbestos removal [9]. Once you’ve handled permits, debris estimates, and testing, gather safety gear and schedule a dumpster delivery for the day demolition begins. This ensures you make the most of your rental period [14].
With these preparations in place, you’re ready to move on to sorting and staging the debris.
Sorting and Staging Debris During the Project
Sorting debris as you work can make the cleanup process much smoother. Create designated areas for different materials, such as clean wood, metals (like copper, steel, and aluminum), concrete and masonry, and mixed renovation waste. Separating heavy materials like concrete and brick from lighter items like drywall or trim can help you avoid extra weight fees on dumpsters, which can range from $40 to $80 per additional ton [14].
Make sure to keep hazardous materials separate and follow proper disposal guidelines [9][1]. Clearly label these items and consider setting aside reusable materials – like cabinets, tiles, or light fixtures – for donation. Organizations like Habitat for Humanity ReStores accept these items and may even provide a tax receipt [1].
Final Cleanup and Post-Project Inspection
Once the debris is sorted and removed, wrap up your project with a thorough site inspection. Perform a "broom clean" by sweeping and mopping floors, wiping down surfaces, and removing leftover tools, bags, or coverings. Be on the lookout for stray nails, sharp metal edges, or sawdust, as these can pose safety risks [1].
Don’t forget to clean out HVAC vents and replace filters after the renovation [1]. Double-check that all hazardous materials were handled by licensed professionals and ensure no debris was buried on your property – burying C&D waste is illegal and can harm groundwater [1]. A final review of your local permit requirements will help confirm you’ve met all regulations before closing out the project.
Key Takeaways for Homeowners
When it comes to construction debris removal, a little planning goes a long way in ensuring the process is safe, compliant, and environmentally conscious.
Here are the key principles to keep in mind:
- Start sorting early. Separate materials like metal, wood, concrete, and drywall into distinct groups right from the beginning. This not only simplifies recycling but can also save you money compared to dumping everything in a landfill. Plus, consider donating usable items – like fixtures or cabinets – to organizations such as Habitat for Humanity ReStores. It’s a great way to reduce waste and might even come with a tax deduction [1].
- Handle hazardous materials carefully. Before beginning demolition, identify and properly manage any hazardous materials. Testing and treating these items is crucial to avoid legal trouble and prevent harm to the environment. And whatever you do, don’t bury debris – it’s not worth the risk [1].
- Know when to bring in the pros. Tackling large-scale projects, mixed debris loads, or hazardous materials on your own can be overwhelming. In these cases, hiring a service like Green Light Junk Removal can save you time, energy, and the hassle of navigating local regulations. They handle everything from heavy lifting to proper disposal, making the process much smoother [14].
The key to a successful project? Understand what materials you’re dealing with, sort responsibly, and don’t shy away from professional help when needed. Following these steps will help keep your project efficient, eco-friendly, and within legal bounds.
FAQs
What dumpster size should I get for my renovation?
When choosing the right dumpster size for your renovation, it all comes down to the scope of your project. For smaller jobs, like a bathroom remodel, a 10- or 15-yard dumpster is usually a good fit. Tackling something bigger, like a kitchen or basement renovation? A 20-yard dumpster is often the better choice. If you’re working on a whole-home project, you’ll likely need a 30-yard dumpster to handle the load.
Don’t forget to factor in space and weight limits – especially for heavy materials like concrete. If you’re unsure, going for a larger size can save you the hassle of dealing with overflow later.
How do I avoid dumpster overweight fees with heavy debris?
To sidestep overweight fees, separate recyclable materials like metal and wood to cut down on the total weight going into dumpsters. Take advantage of curbside pickup for lighter items such as drywall or fixtures. For heavier debris, like concrete, opt for a dumpster with a weight limit that matches your needs, and avoid combining heavy and light materials in the same container. Be strategic about your rental timing to ensure you stay within the rental period and weight limits included in your agreement.
What should I do if I suspect asbestos or lead paint?
If you think there might be asbestos or lead paint in your project area, it’s crucial to bring in a licensed inspector to test for these dangers before beginning any work. Handling these hazardous materials requires professional expertise, and they must be disposed of at specialized hazardous waste facilities. You can’t simply toss them out with regular construction debris – proper disposal is essential to maintain safety and follow regulations.